Posted in Uncategorized

Two Completed Before the New Year (and a Knitting Injury)

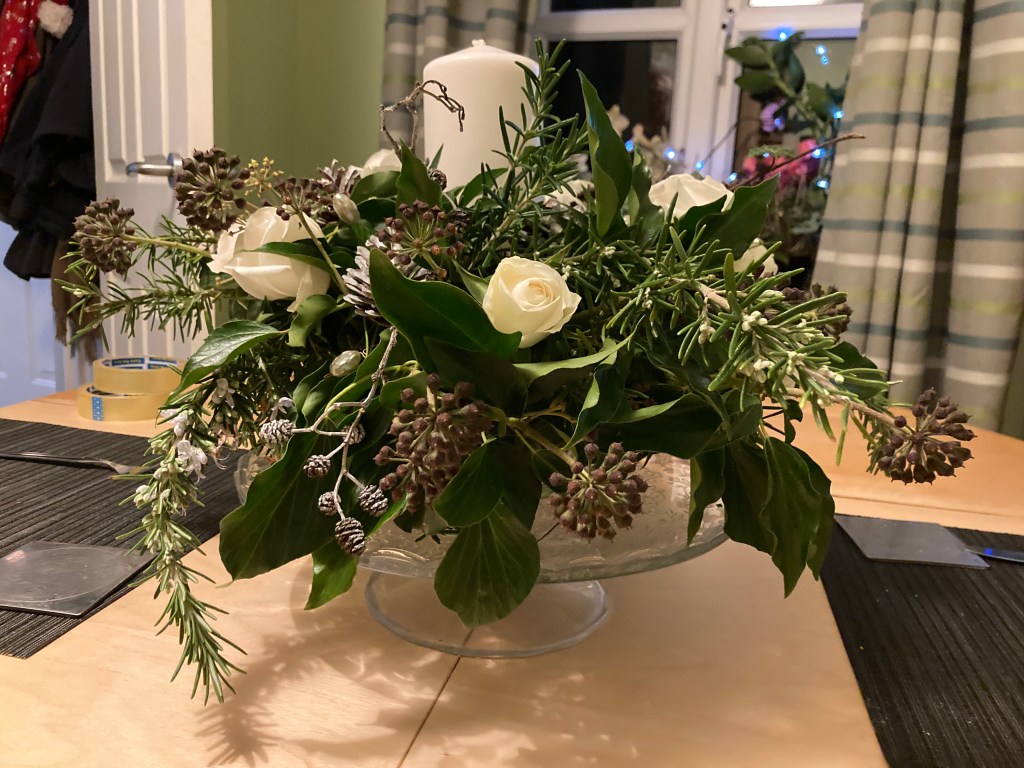
I finished off a couple of projects this week, one large, one small.

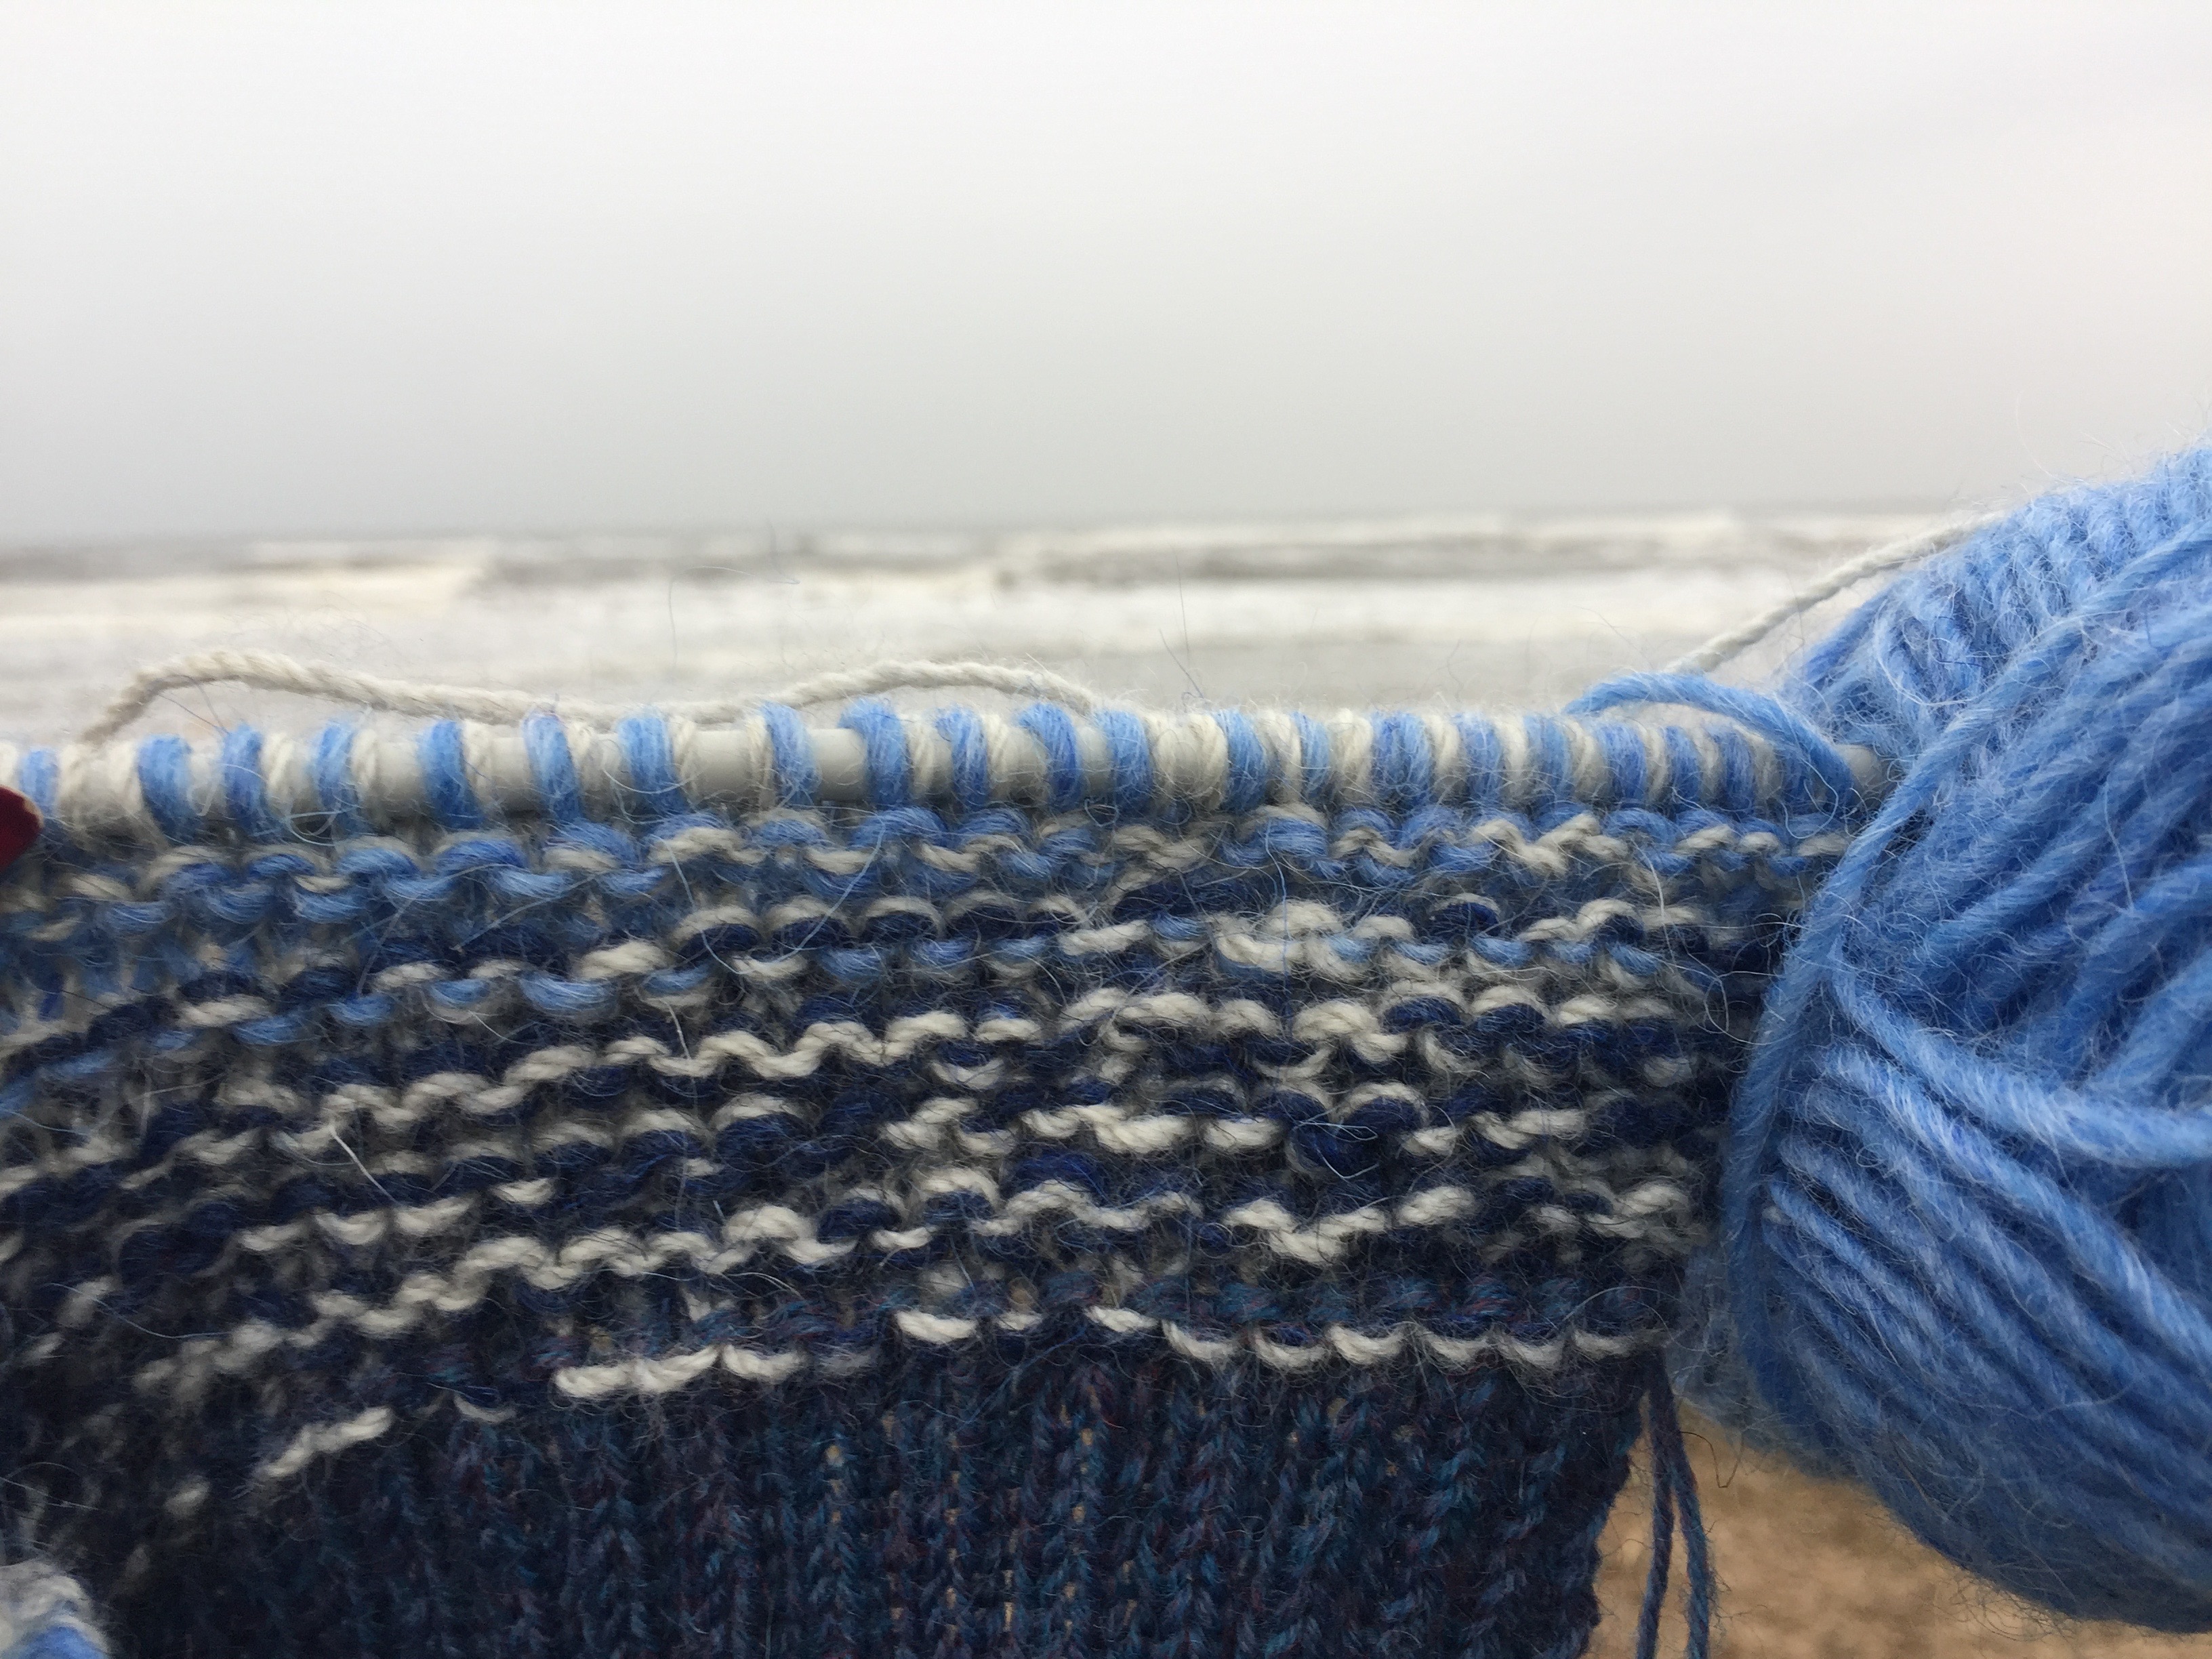
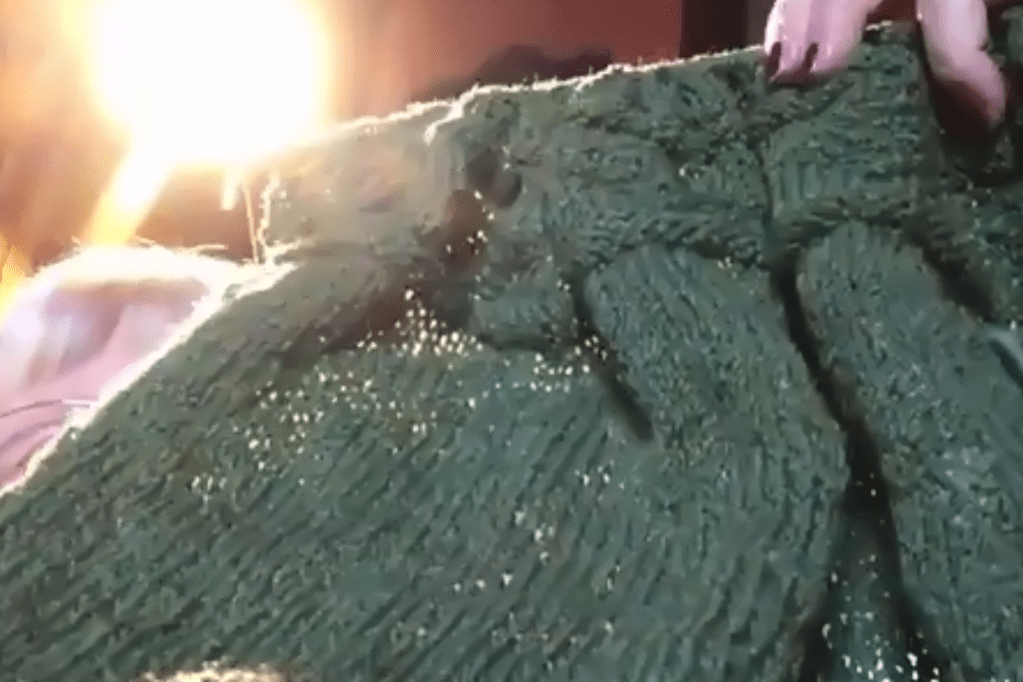
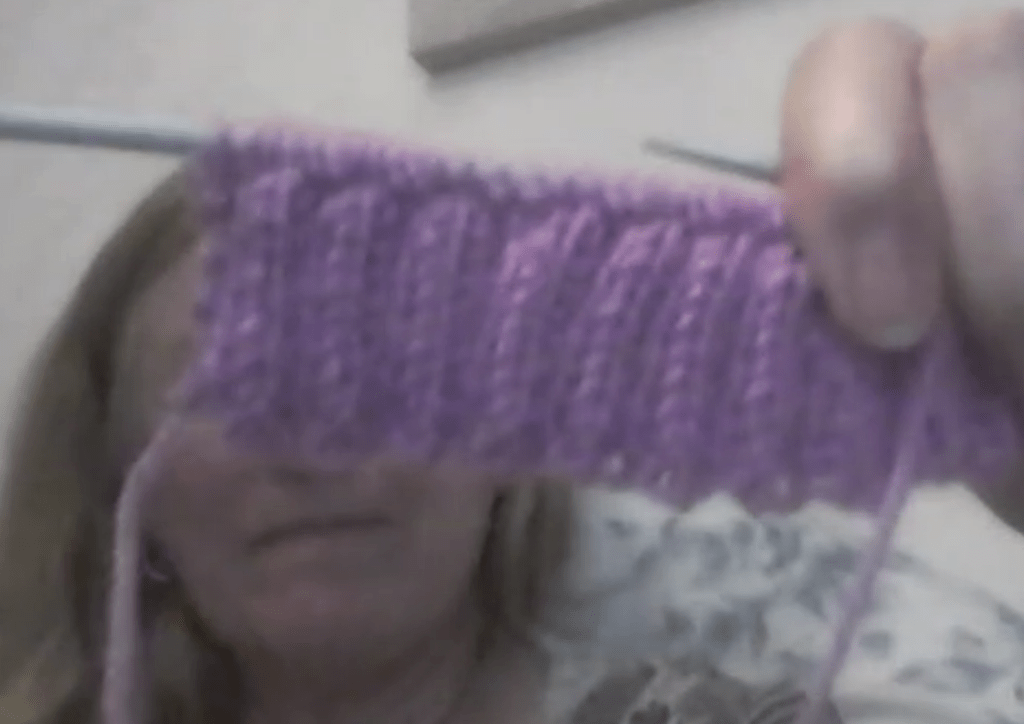
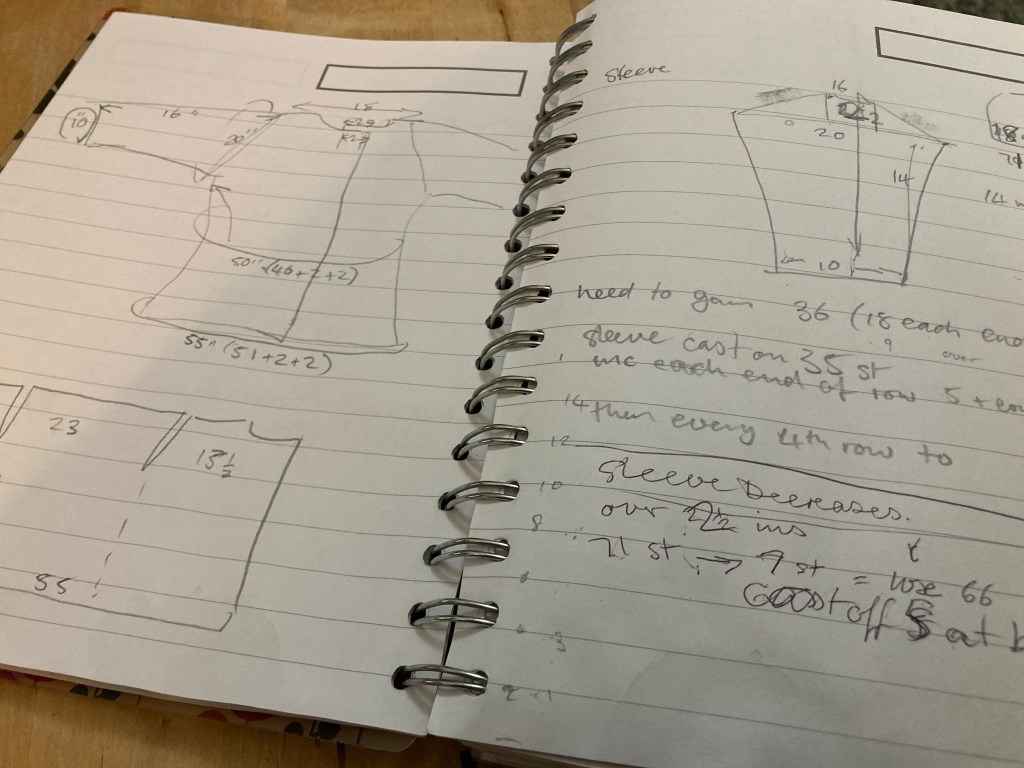
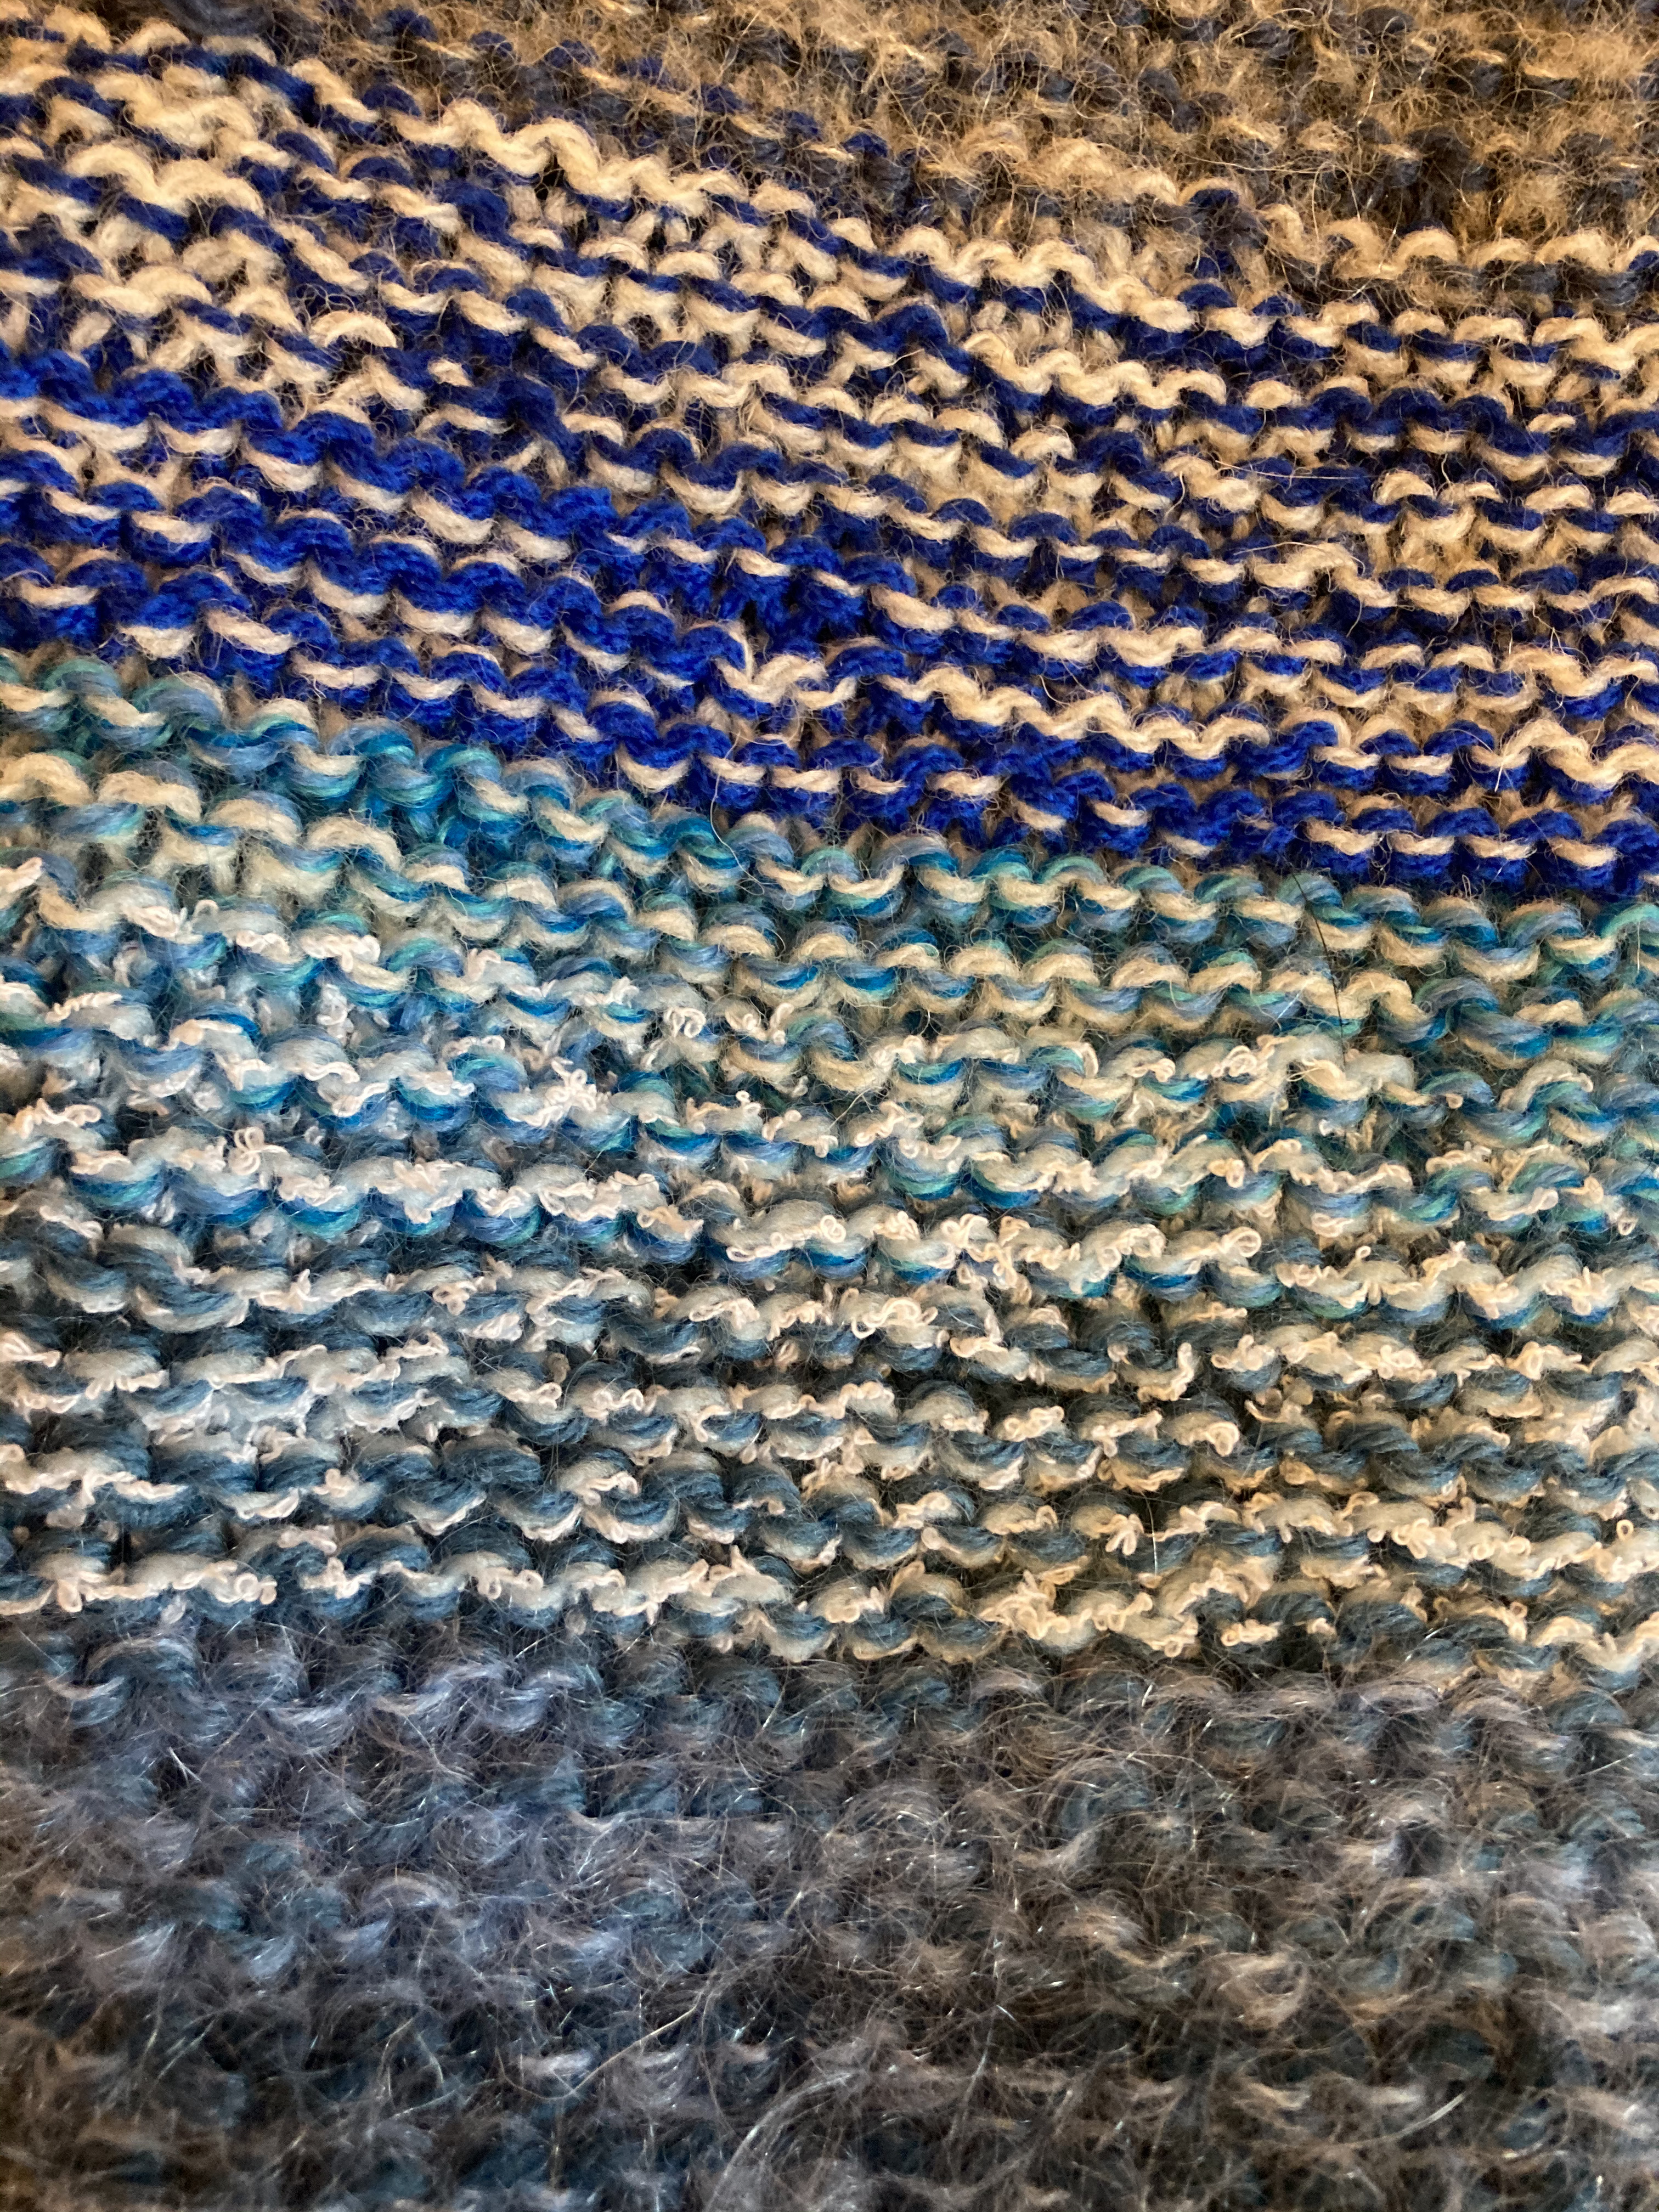
The large one has been going on for ages and came about because I wanted something big to use up some scraps of yarn from the stash. I have a really useful poncho/cape, made of a lightweight fleece material, so my original idea was to knit something the same shape, but with a big ribbed collar that could be either worn open or buttoned up to make a polo neck. For the main body part I wanted to use up yarn of different thicknesses so I used multiple strands, the equivalent of two strands of double knitting or one each of 3 ply and aran, worked in garter stitch on 5.5mm circular needles. I measured, calculated and drafted a pattern, but although I did a lot of knitting , it just wasn’t working and the whole thing would have been really heavy to wear. I pulled all but the collar out and had a rethink.

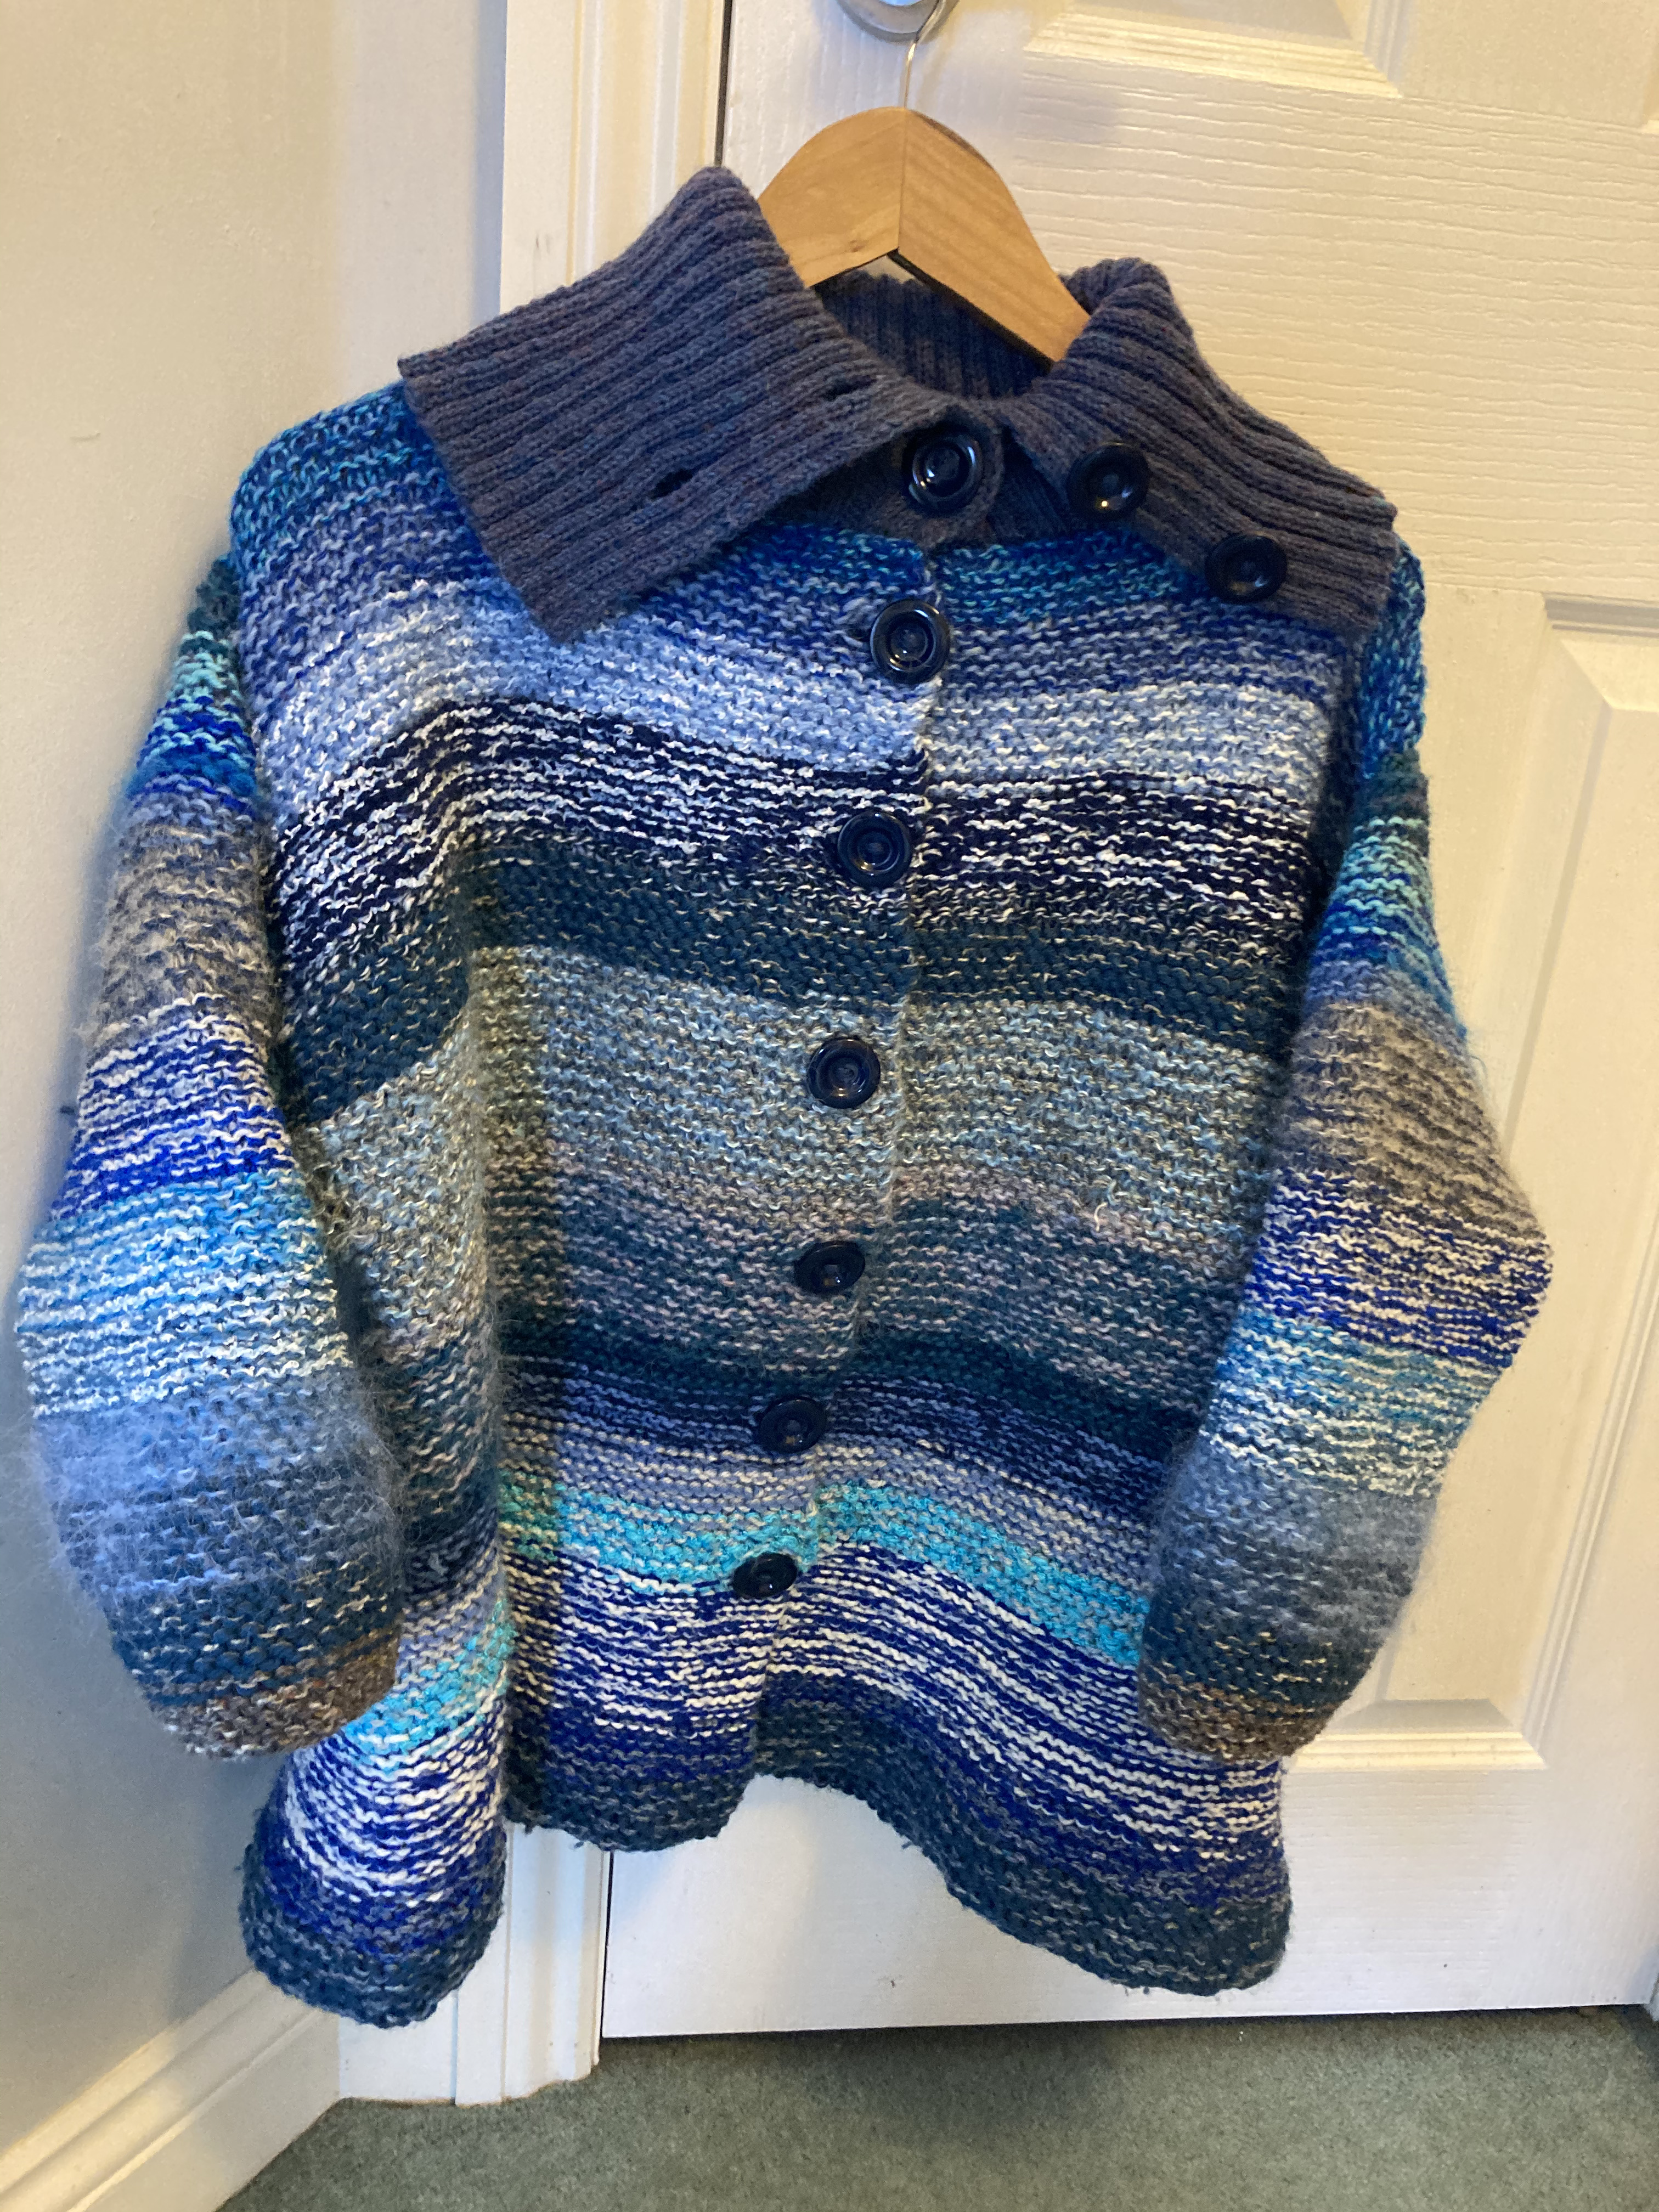
I decided to use the same collar and make a jacket in the same multiple strand garter stitch, so I took some measurements and redrafted a new pattern. It’s the first time I’ve designed a knitting pattern on this scale.

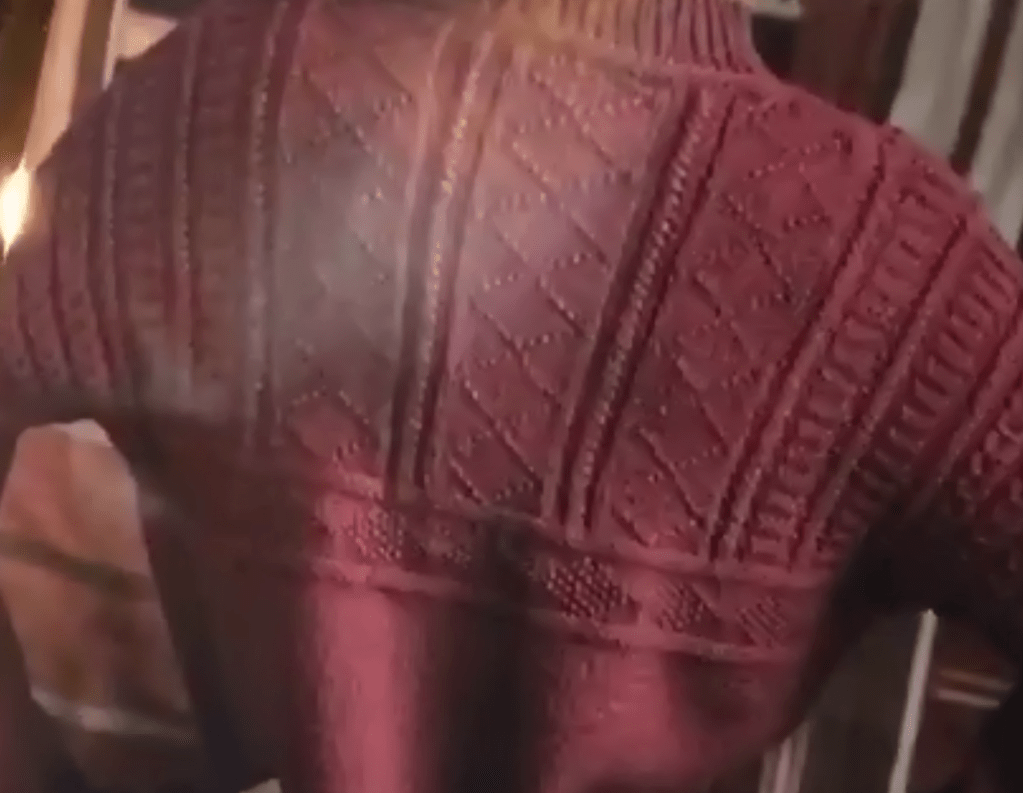
I finally got it all finished, sewn up and buttons on and I’m really happy with it. It’s really cosy and warm to wear and the fit is good as it was made to measure – I have a long body, narrow shoulders and short arms so I always have to adjust patterns and knit shorter sleeves, which is a pain if they include colour work or a textured pattern.

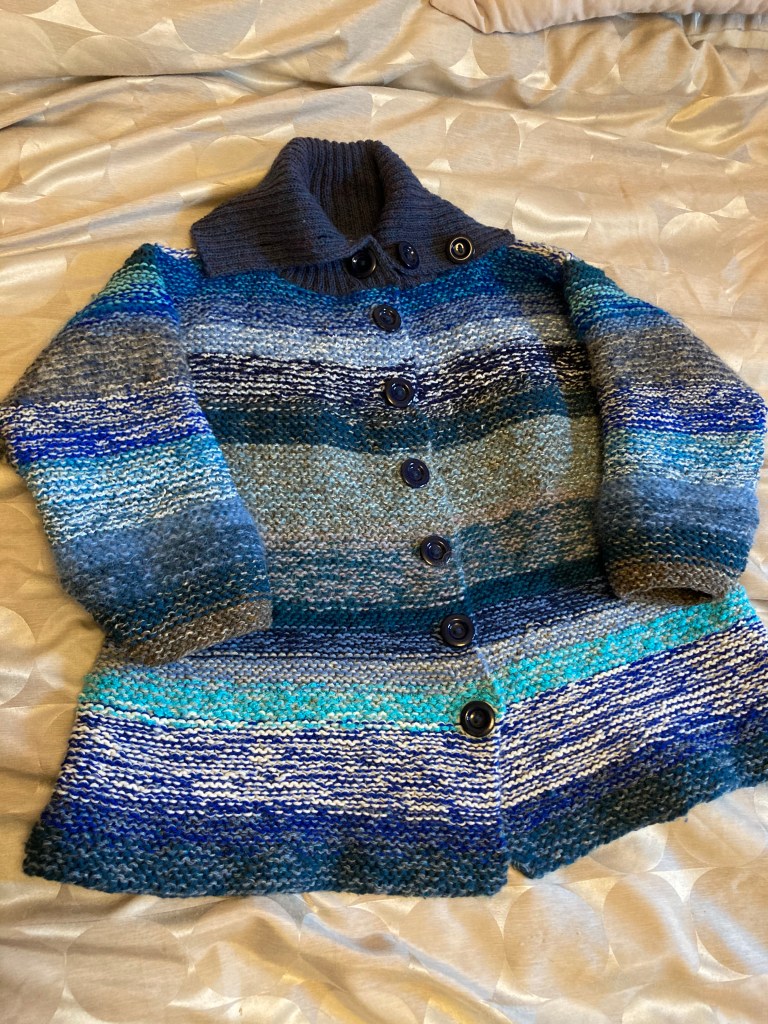
I particularly like the collar – knitted in 3ply yarn, it’s a lovely stretchy K2P2 rib and can be worn open or buttoned up.

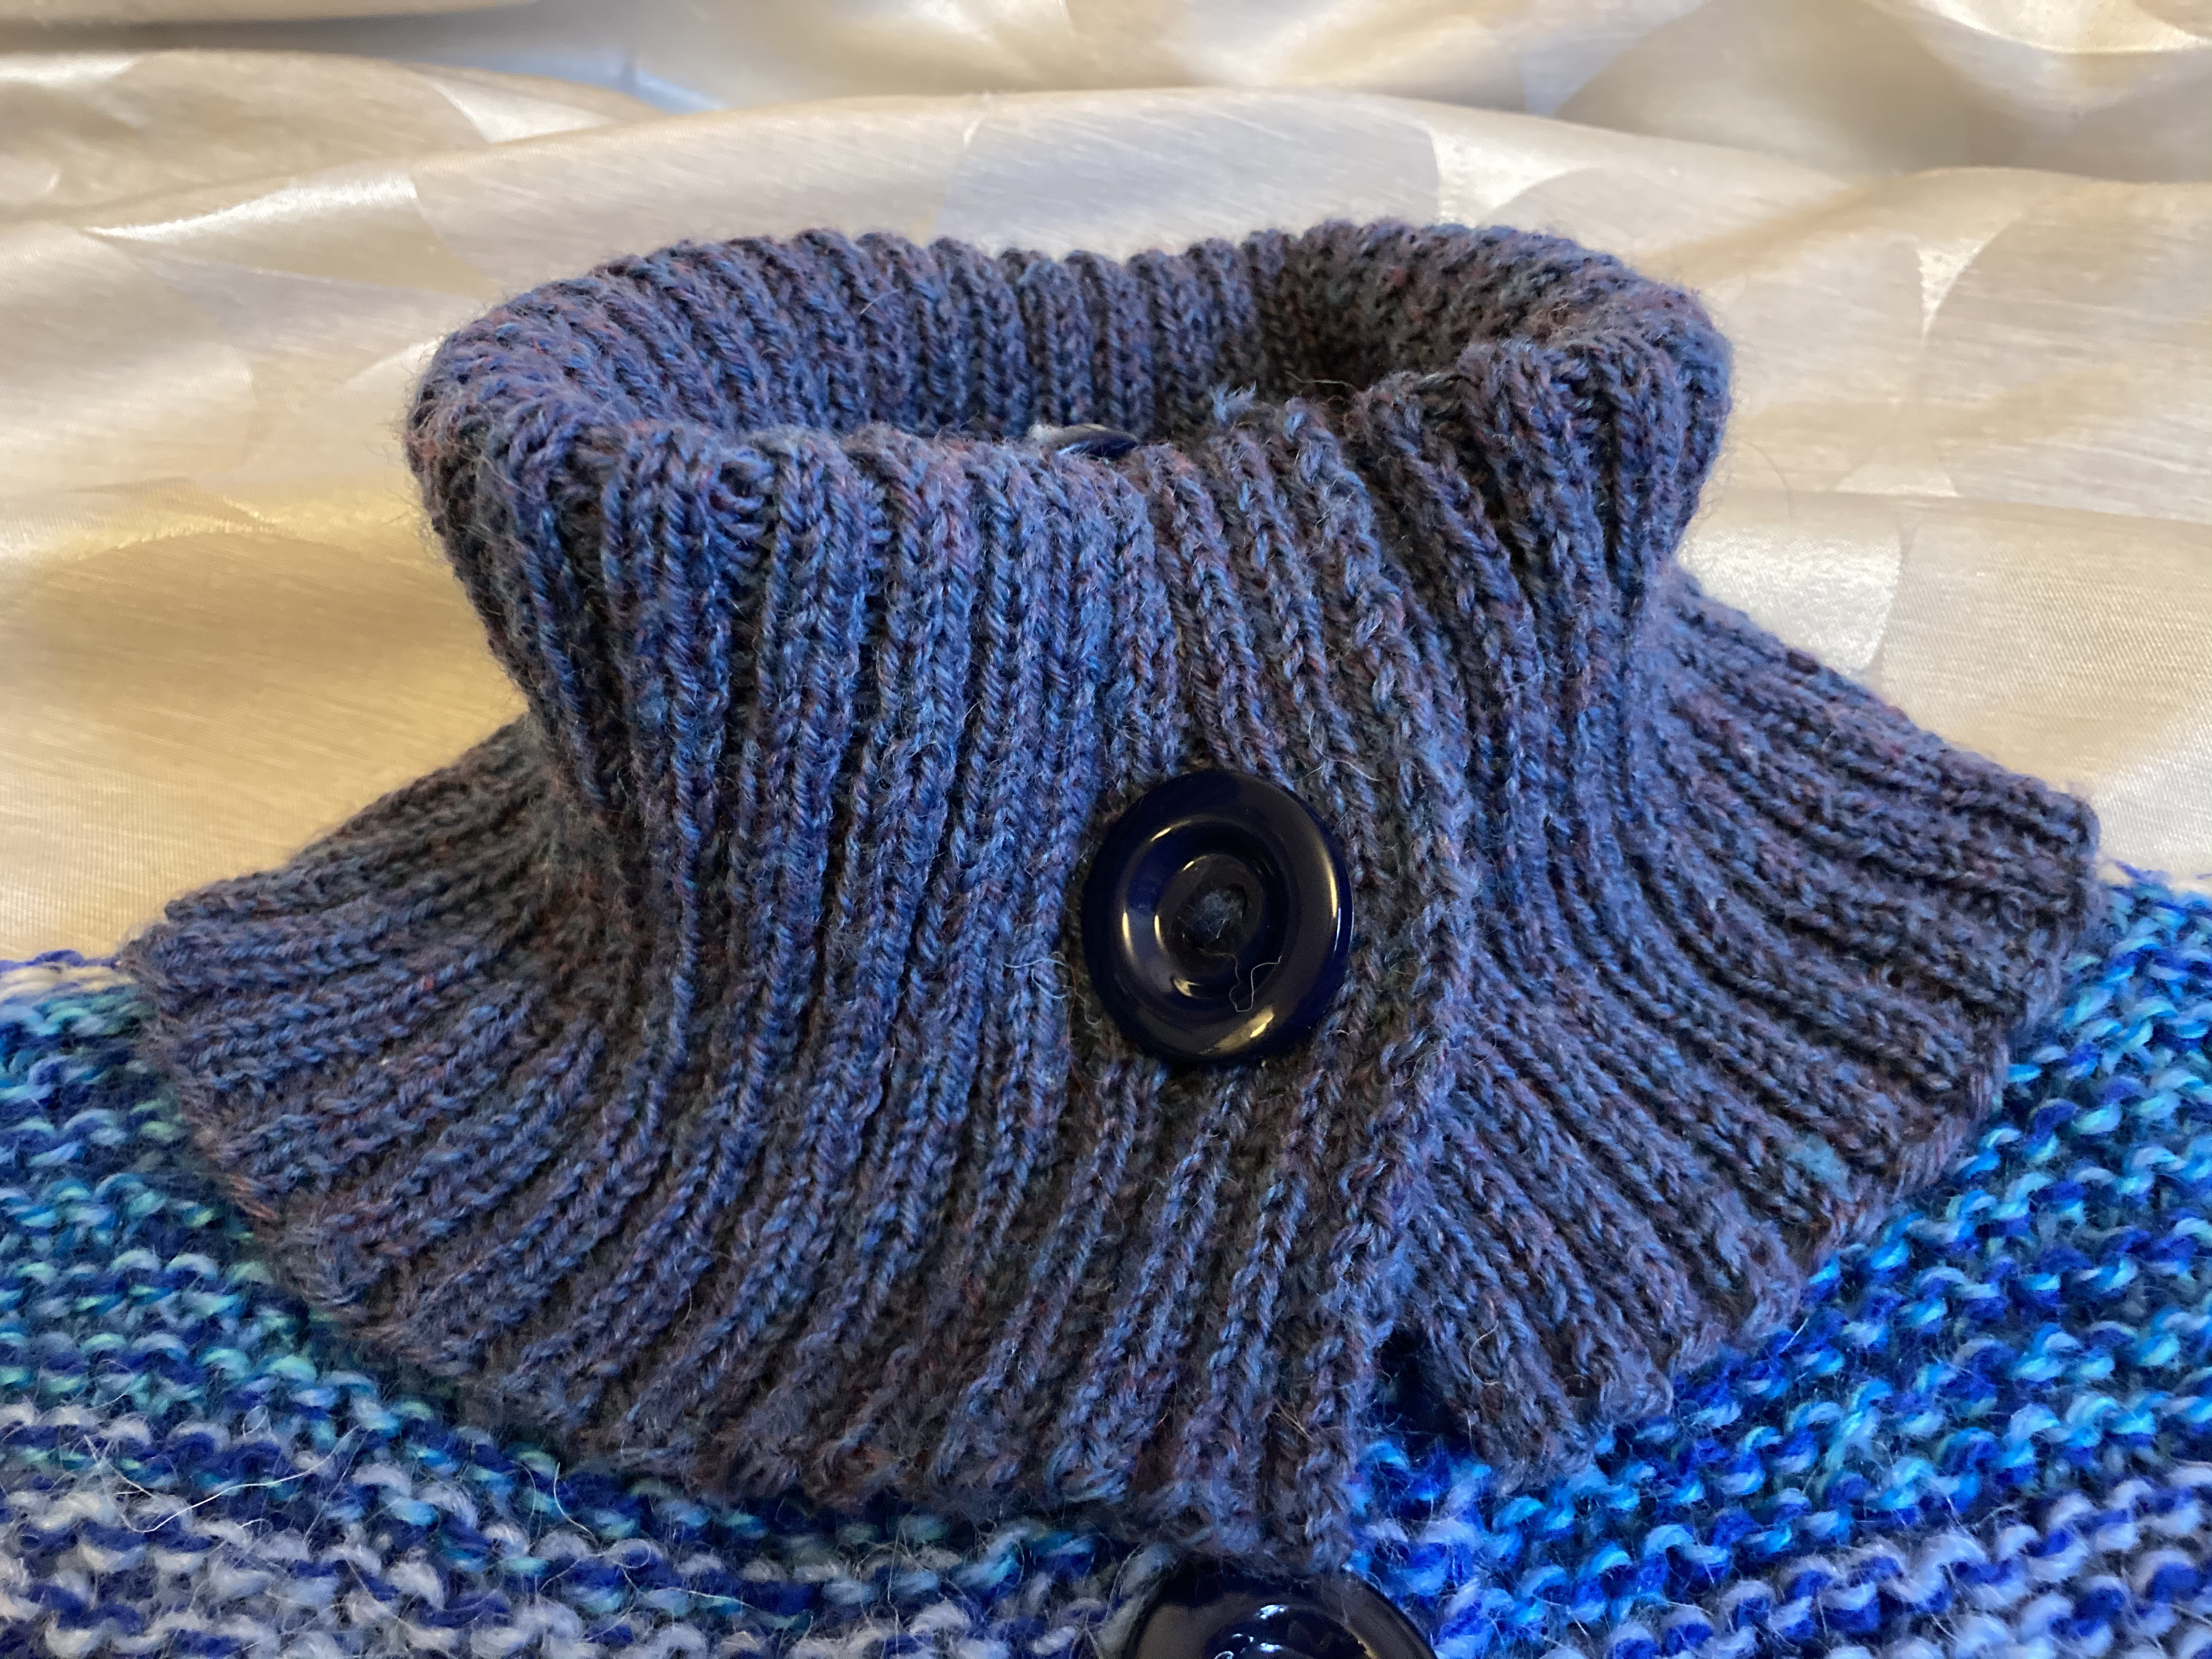
I’d picked all the scraps of blue and grey yarn, and some white out of the stash and overlapped the colours as I worked with the two strands, to give a shaded effect. I quite like that I’ve used scraps left over from past projects – the collar is a 3 ply wool that I bought on holiday in Scotland and used to crochet a shawl. I can also spy the very first handspun yarn I made and some I bought on a very memorable trip to Iceland.

The “Scrappy Cardi” as I started to call it is going to be a useful addition to my winter wardrobe.

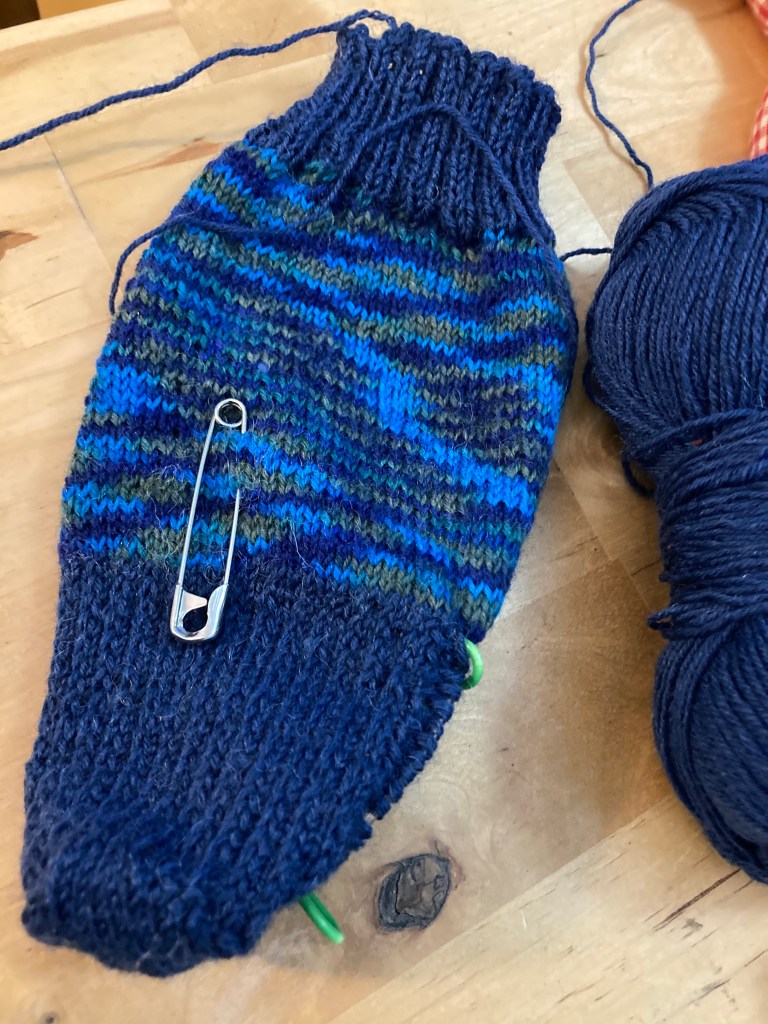
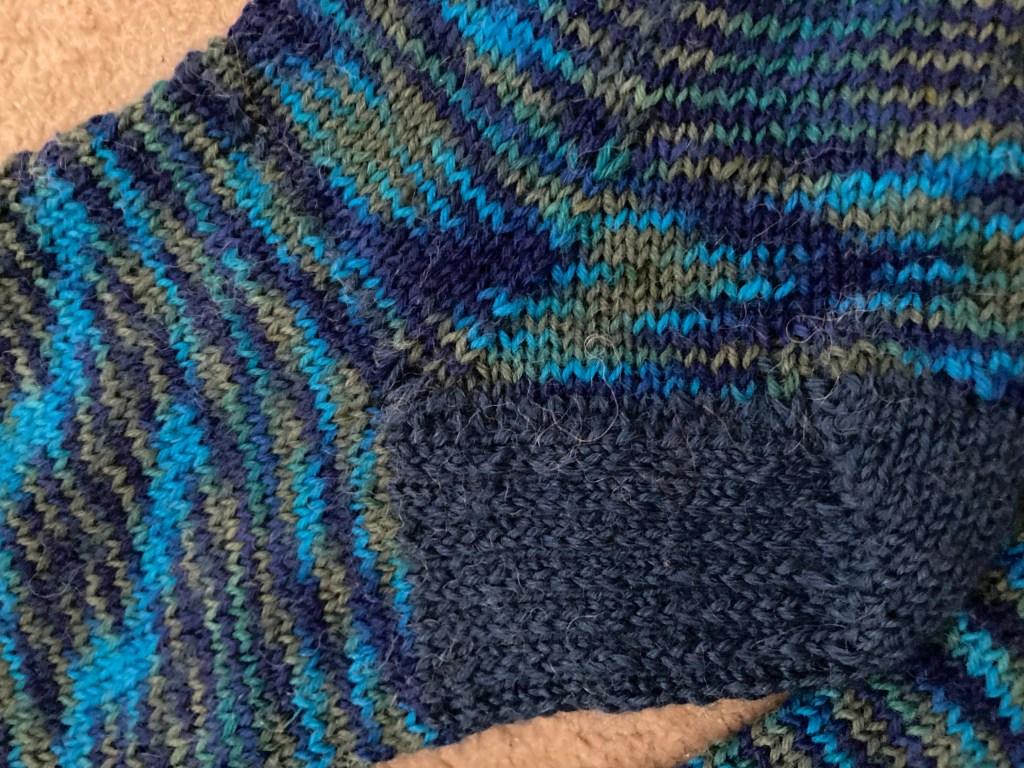
The other project I finished off this week was a pair of socks I’d cast on a few weeks back. It’s classic topdown construction with contrasting top edge, heel and toe. I can’t remember where the variegated sock yarn came from but I love the colours.

I was quite glad to get these off the needles because they were responsible for a minor but gruesome injury I sustained the other week. I dropped a stitch and got out a very fine crochet hook to pick it up – the kind you use for crocheting lace: more like a hooked needle. I must have put it down on the arm of my chair and it rolled on to the seat. I got up to do something and when I returned and sat down, the hook stuck straight in the back of my thigh! Fortunately Daughter came to the rescue and carefully removed it (not easy with that hook). Antiseptic spray was applied and it all healed up fine. You never really consider knitting to be dangerous but I suppose I was suffering for my art!

Posted in Uncategorized

New Year Resolutions: Looking Back and Looking Forward

The turn of the year is an opportunity to review those resolutions from a year ago and make new ones. Who could have predicted what 2020 would become?

At the beginning of the year my blog was only a couple of months old. I was creating content every day and that was mostly knitting related. I’d started it as part of my plan to learn a new skill every year. I set some knitting and crafting New Year resolutions last January

  1. Make a Santa hat. I completed this last January, though I had fewer occasions to use it with no choir or ukelele gigs this Christmas. I never knitted a Bah Humbug version for K (who I described at the time as my personal Grinch). Maybe this year?

2. Knit a Christmas Jumper. I cast this on in April when the Pandemic had taken hold and it became my lockdown project. I bought the yarn online and remember quarantining the parcel for 72 hours before I opened it. I stopped knitting altogether at times but finally completed it in late August. I’ve loved wearing it this Christmas.

3. Keep on stash-busting. I had set out to use scraps of blue and grey yarn to make a cape/poncho but it didn’t workout. I pulled it out and redesigned it as a jacket which I finally finished a couple of days ago! This has made a smaller impression on the blue and grey parts of the stash than I’d hoped. I need to think about a project that will use another part of the stash.

The other craft materials I’ve accumulated got used too. Quilting fabric was made into masks and I used seaglass to make mosaic coasters and Christmas baubles. I made pheasant feather baubles too, and driftwood candle-shades, wax melts….

I still have piles of material in the craft room, so the stash-busting is ongoing.

4. Finish as many UFOs (Unfinished Objects) as I can . I completed a piece of tapestry during lockdown, which suited my state of mind at the time. Now it’s finished I’m not sure what to do with it as I don’t like it enough to frame or make into a cushion. I also finished a cobwebby scarf, a needlefelted unicorn from a kit among other things. There are still more projects to finish but I’m getting there.

5. Tidy up the craft room. This is ongoing and very much linked to 3 and 4 but at least I don’t have to share it with Son’s drum kit, which has been sold. he’s more of a guitarist these days.

6. Get out more – with my knitting. I had resolved to spend more time sitting in a car with a nice view while K walked the dog, but as lockdown began and there were no essential journeys allowed, driving to the beach stopped – later it was hard to get anywhere near as more and more tourists arrived in the area. I did get out more on my scooter for local dog walks and that reconnected me with nature, particularly wildflowers, and I started regular Wildflower of the Week posts on the blog. As Summer turned into Autumn the blackberries and sloes ripened and I got into preserving and making fruit gin liqueurs.

7. Improve my photography. I began using lenses that clip on to my mobile phone, including a macro lens for close ups of flowers. I also use tripods and remote shutter controls so my pictures are sharper. Still lots of room for improvement though!

8. Learn brioche. This was achieved when I made hand warmers, both 2 and one-coloured versions. I love the soft squishy feel of brioche stitch.

Of course I did other stuff this year. I have learnt a new skill : spinning yarn since I got an e-spinner for my birthday – with more equipment for Christmas I think this will take up a lot of crafting time in 2021, especially with all the gorgeous alpaca fibre I’ve been given.

So here’s my list of crafty intentions for 2021 – they deliberately include more of the same ongoing items, and some new ones.

  1. Make a Bah Humbug hat for K (like a Santa hat but in black).
  2. Continue stash-busting, including another big project, to be decided.
  3. Finish more unfinished projects
  4. Continue to sort and tidy the craft room
  5. Continue spinning, including a jumper for myself
  6. Get out more to knit if and when I can
  7. Keep improving the photography
  8. Learn how to dye yarn and fibre (this could be my new skill for 2021)
  9. Use natural fibres and upcycle/resuse/recycle wherever possible

I think that’s enough to be going on with!

Finally, a very Happy New Year to everyone who reads this. We got through 2020 and what it threw at us so we are well equipped to deal with anything this year sends our way. I remain hopeful that things will improve with the rapid rollout of vaccines. Here’s to a safer, calmer 2021.

Have you made any New Year resolutions?

Posted in Uncategorized

From Ukraine with Love: My New Drum Carder

Having spent hours hand carding alpaca fibre over the last few weeks I’d been dreaming of owning a drum carder, but it did seem to be something of an extravagance until one of my fellow Knit and Natterers told me about hers. She found it on Etsy and it came from Russia. It was much cheaper than the well known makes and works really well. I looked online and found the seller. Sure enough, full size manual drum carders were available for under £200 plus post and packing and the reviews were excellent, so I took the plunge and ordered one. The only negative stated on the reviews appeared to be delivery time, but I was in no particular hurry. I was delighted when just 16 days later, on Christmas Eve, a large package arrived from Ukraine (not quite Russia). Today I finally unboxed my new drum carder and used it for the first time.

It was certainly well packaged, but after removing plastic, brown paper and two cardboard cartons the drum carder was finally revealed.

It came with a hand card (to clean the drums?) and a doffer (a long spike used to remove the batt of fibre from the drum) – I do love that there is a whole new vocabulary attached to spinning and fibre preparation.

All I needed to do to make the drum carder ready to use was fit the hand crank and the table clamps.

I couldn’t wait to get started so I grabbed some alpaca that I washed the other week, teased it out and gradually fed it in until the large drum was covered.

I used the doffer to remove the fibre and fed it through a second time.

This is the beautiful alpaca batt that resulted. I love my new toy!

Posted in Uncategorized

Thank you Santa!

I was very lucky with my Christmas presents. There was a definite theme running through many of the gifts I received. Father Christmas obviously wishes to encourage me to continue with fibre and yarn-related hobbies!

This year’s new skill was spinning. I have made a point of learning something new every year, especially since I retired and this one has really got me hooked. I was given a load of accessories for preparing and spinning yarn. I’d asked for this Ikea Variera pot lid rack to use as a Lazy Kate to ply yarn spun on my Electric Eel Wheel Nano e-spinner – the bobbins fit the pins perfectly. For carding and blending I got a pair of Ashford hand cards. Then there is a cute sheep design niddynoddy and some lingerie bags for washing raw fleece.

I also got a yarn swift…

…and a ball winder.

In 2021 I plan to start dyeing fibre. This acid dye starter kit from DT Craft and design includes 12 different colours of dye, along with citric acid to fix the dye, protective gloves and a measuring spoon. There is also a very detailed instruction booklet.

I also got some books. I’m still trying to use up all my oddment of yarn and I got three books for exactly that, including one full of designs for knitted and crocheted flowers. The others are for the dyeing adventure to come: “Dyeing to Knit and Spin” by Felicia Lo and “Wild Colour” by Jenny Dean which is all about natural dyes.

I’m very lucky indeed and can’t wait to start using all this new kit.

Thank you Santa!

Posted in Uncategorized

Christmas Greetings (and a Table Centrepiece)

Happy Christmas from Northumberland, where there was dusting of snow and it was a cold but sunny and bright Christmas Day. We had a lovely day that involved opening and delivering presents, a beach dog walk and five of us for a delicious roast goose dinner, expertly prepared by K. Daughter made a decadent dessert. Son, who recently passed his driving test, was his granny’s chauffeur for the day.

On Christmas Eve I made this flower arrangement for our table. For the base I used a glass cake stand. I cut a block of florist foam to fit a glass bowl, soaked it in water for 10 minutes then sliced it in two, cutting a channel in the centre to fit round the stem of a wine glass. I used blu-tak to secure a white pillar candle in the wineglass.

We used a trip out to glean some sprigs of ivy from the hedgerows, both pieces of the mature plant with flower clusters and young shoots with small triangular leaves. I also used rosemary from the large bush in the garden and some white roses from the supermarket.

I added larger pieces of foliage first, overhanging the edge of the bowl. I kept rotating the arrangement and checking what it looked like from a seated position so I could keep the shape and distribution of material even – a table centre has to look fairly consistent from all angles.

I then added the roses, trimming stems to fit and inserting more pieces of foliage to fill in any gaps

I also used dry sprigs of alder cones and wired pine cones, both sprayed white. I also found some pearlised and crystal beads from an old necklace and wired these to add a little bit of sparkle.

These were also pushed into the foam throughout the arrangement.

The final result!

I hope your Christmas Day was as good as it possibly could have been. This year many people have had to quickly scale down their celebrations and could not spend the holidays with their loved ones as COVID restrictions were tightened at the eleventh hour. I’m thankful that I could spend the day with my family.

Posted in Uncategorized

Mindful Christmas Baking

The house smells of ginger and cinnamon. I just baked two dozen mince pies and a couple of trays of my Christmas cookies.

There is something special about pre-Christmas baking. It’s more than just preparing food, albeit seasonal favourites. It’s the only time of the year I really get to play with the fancy cutters and edible glitter.

I suppose there were other more pressing tasks that I was putting off, so you could say I was procrastiBAKING……..or even proCRAFTinating. I did need a bit of an escape from reality though.

Here in the UK, huge additional anti-COVID measures were implemented at short notice covering large parts of the South East. Previous Government plans to relax the rules over Christmas have been stopped for the whole country. Travel restrictions have been put in place. For many people this means that anticipated family get togethers are cancelled. I have friends who won’t be able to spend Christmas with their children this year as they can’t travel home. Thank goodness mine are close by and for now at least, infection rates are lower here in our part of Northumberland.

I felt the need to avoid the news and become absorbed in something creative to occupy all my senses for a couple of hours. With those Christmassy smells and tastes (because I did eat the leftover fragments of cookie dough); the feel of the dough in my hands; the ping of the oven timer and the sight of a batch of mince pies sizzling as they come out of the even, It’s one way to escape reality for a couple of hours, even if it’s only in the kitchen.

Stay safe everyone.

Posted in Uncategorized

A Trip Around the Christmas Tree

I was admiring my Mum’s Christmas tree when I called round for coffee (all above board – she’s in our bubble and we have enough space to socially distance). We talked about the tree decorations that she’s collected over the years. I remember some from my childhood, others were bought as souvenirs on her travels or were gifts from friends. I thought about my own tree and how some of our decorations are special, each with their own story.

This glass dolphin was bought on the first of my three visits to the USA. We flew to Atlanta, met up with family members, then drove to the South Carolina Coast for my cousin’s wedding. She had met her husband when they were working together in a beach resort. Our extended family rented a huge beach house for the week of the wedding and had a great time, both experiencing the wonderful southern hospitality and seeing fascinating wildlife we don’t see at home, especially the dolphins and pelicans we watched from our balcony every day. There were alligators too! The following week K and I, and the kids, both very young at the time, did a road trip south along the coast then back to Atlanta Towards the end of the week visited Stone Mountain, a theme park not far from the city which included a number of artisan workshops, where I bought the dolphin ornament. It was the perfect souvenir of an amazing trip

Edinburgh is one of our favourite cities in the UK. We visit regularly, though not this year, for the occasional weekend and have found a gorgeous boutique hotel that is a pleasure in itself. Whatever the weather, Edinburgh has many delights. In winter, the Christmas markets, the lights and other special events are quite magical. There are museums and galleries and shops to visit if the weather is poor, but if the sun shines, there are parks, and the Botanical Gardens to enjoy. In August, the city is packed out for the Edinburgh Festival. We travel up to spend a day packing in as many Festival Fringe shows as we can. We have also visited the Queen’s Gallery at the Palace of Holyrood House (The Queen’s official Edinburgh residence), The art collection is superb and parts of the Palace and Gardens are open to the public too , There is the obligatory gift shop and cafe, both excellent. I bought this embroidered lion decoration, which represents the lion on the royal coat of arms.

Some of the items on our tree originate much closer to home. Some weeks back I made this bauble with sea glass collected from a beach near to where we live. Living near the sea (we can see it from the window….just) is a big part of our lives really. it plays a major role in the culture and history of the area and we enjoy spending time on the beach and on the water. It’s only right that something from the sea has a presence on our tree.

Do you have a favourite Christmas tree ornament? – I’d love to hear about it

Posted in Uncategorized

Christmas Crafts – Crackers from a Kit

I saw this kit online from The Works and as I hadn’t bought crackers at the time I thought I’d get this kit instead. I chose this silver marbled design though they had others available.

The kit includes the pre-cut cards to make the crackers, which have the snaps already glued to the inside. along with ribbons, paper hats, jokes and name tags. All you need to provide are gifts to go inside (if you want to), so you could add something useful or personal (and the name tags make them perfect for that), After all, the world really doesn’t need any more tiny plastic aeroplanes that are left on the table, to be binned along with the rest of the Christmas dinner debris!

There were instructions on the packaging, including a template so you can see on the pack exactly what the final diameter of the cracker will be. That’s important if you are choosing gifts that will fit inside. I’ve added a few of steps of my own here . The cardboard shapes have very lightly scored lines and I found the crackers held their shape better if I creased along these lines to emphasise the fold points.

I then opened the card out flat, printed side down and rolled it up. A cardboard tube from inside a kitchen roll was my secret weapon at this stage, It held the shape of the cracker roll for the next stage, so I didn’t squash the whole thing flat.

There are three tabs along one long edge that slot into the corresponding slits on the opposite edge. I found it easier to do the middle one first. I simply moved the cardboard kitchen roll tube along as I secured each tab, removing it when all three were in place. It is a bit fiddly but the tabs do fit – just be careful not to tear the card – if you do a small piece of sellotape on the inside will repair it.

The next stage was crimping one of the ends and tying the ribbon on. Important! Don’t forget to drop the paper hat, motto and gift inside before repeating this step with the the other end of the cracker! I’m so glad I remembered! – I was glad Daughter was around to help (it was one of our Crafty Monday sessions- it was so much easier with two people. We deployed a length of craft wire here to loop around the crimp point, one of us pulling gently on the ends of the wire to form a narrow “waist” and them the other tied one of the pre-cut ribbons in a double knot. You can then gently pull the wire out

The name tag is self adhesive so can easily be attached after you’ve written it

There were materials to make six crackers and they did not take long to assemble, especially with two of us working on them. As you’d expect, the first one took longer, but once you work out how to do it the others take shape pretty quickly.

I’d definitely use these again. I love that they are plastic free and that you can add your own gift. The name tags means that you could use these instead of place cards. They could even be used as an alternative way of wrapping Christmas gifts, especially small, awkward shapes.

That’s something else crossed off my Christmas “to do” list!

Posted in Uncategorized

Knit and Natter 11th December

There appeared to be a bit of a spinners takeover at Fridays Knit and Natter Group. The two of us who spin are both new to the craft (since first lockdown) and I think we are both craving the opportunity to compare notes! My fellow spinner has now spun enough yarn in this lovely deep green to make an adult jumper and is well on with knitting it. This is going to be fabulous – it’s gansey style, with a lot of textural design across the chest and shoulders. You can see this in more detail on the pattern illustration

Her husband also started spinning at the same time so he joined us for part of the session (from another computer in the next room, where his spinning wheel is set up) – as always, screenshots don’t always work too well but you can make out the flyer on his wheel here.

She also told us about Knit in a Box. This is a subscription box – every month a box is delivered containing yarn and everything else you’ll need to make a garment (pattern, buttons etc) along with some treats (eg sweets) and knitting accessories. There are various subscription options available from 3 months in length and to knit items for babies, children (either girl or boy) or ladies.

Some lucky grandchildren have received a nice surprise from another member of the group. She just finished sewing these delightful Christmas stockings. There will be no arguments about which stocking belongs to which child when they are personalised like this. Very festive!

Since she got hold of some wool and needles there’s been no stopping our new member. She’s been making baby clothes and showed us her work in progress on this hat – such a gorgeous pink colour.

I’m still working on socks – I’ve not made much progress, but have now turned the heel on sock one.

Our online Knit and Natter Group runs on Zoom and is organised by the Social Prescribing Teams of GP surgeries in North Northumberland. It’s going to be pretty busy for the surgery staff over the next few months as COVID vaccinations are rolled out, not just for the clinical staff giving the injections but all the others too, organising the sessions and appointments and maintaining contact with the most vulnerable patients. We hope that Jane who hosts our meetings will be able to find time to wind down and do some relaxing knitting. She’s just learnt how to knit since she started running the group and has totally mastered garter stitch. We reckon she needs to get on YouTube to learn purl then she can do stocking stitch.

Posted in Uncategorized

Crafty Throwback – A Parade of Ponies

A few years ago a lovely friend of ours gave birth to a daughter. I usually knit clothes for new babies but this time I decided to do something different. I thought it would be fun to make a soft toy. The new mum has been a keen horsewoman since she was a little girl and has several horses. I thought I’d make a toy horse and make it as much like her favourite one as possible. I found a crochet pattern on Ravelry but adapted it quite a lot, changing the hooves, legs and ears significantly. That’s how I came to make a toy version of Mr Messy the chestnut cob. He’s very showy with a blonde mane and tail. I copied his white feet, crocheting them in white yarn – this worked at the second attempt. I was working from a picture of Mr Messy that had been taken after he’d been through some mud so I didn’t realise he had any white on his legs at all! I used beads for eyes, sewed on a felt patch for his white face and embroidered on his other features then attached a fringe for the mane and some longer strands for the tail.

When our friend had a second child, a boy this time, what could I do but make a version of her second favourite horse, Hettie the black mare.

Having seen the two I made for the babies, another friend ordered one of each of her two horses, a couple of hunters, both bay geldings, Roper and Toasty. I only have a picture of Roper here. but when I made these two I became aware of just how many different browns there are. At one point daughter was following a horse around holding up three balls of yarn so she could find the best match. I only make them now and again, but if I ever set up a business doing these I’d have to call it “Fifty Shades of Bay”!

Before long that baby girl I first made a horse for was big enough to be riding a pony of her own. Here she is with Tansy the Exmoor pony.

Around this time I’d learnt how to do needle felting, and this seemed like a great way to do facial details so I surface felted the little white star or Tansy’s forehead, her nostrils and the lighter colouring on her muzzle.

The other detail I always add are the horseshoes, like on the latest mini horse that I just finished last week – a nice finishing touch!

They are fun to do (though I wouldn’t want to be making them full time) and once you’ve overcome the initial colour matching challenge they come together quite quickly. They’ve always gone down really well with their new owners, a sort of cartoon miniature version of a much loved horse or pony.

Many thanks to A Heatherington and A Straughan for the photographs of their children and horses!