Posted in Uncategorized

Christmas Crafts – Crackers from a Kit

I saw this kit online from The Works and as I hadn’t bought crackers at the time I thought I’d get this kit instead. I chose this silver marbled design though they had others available.

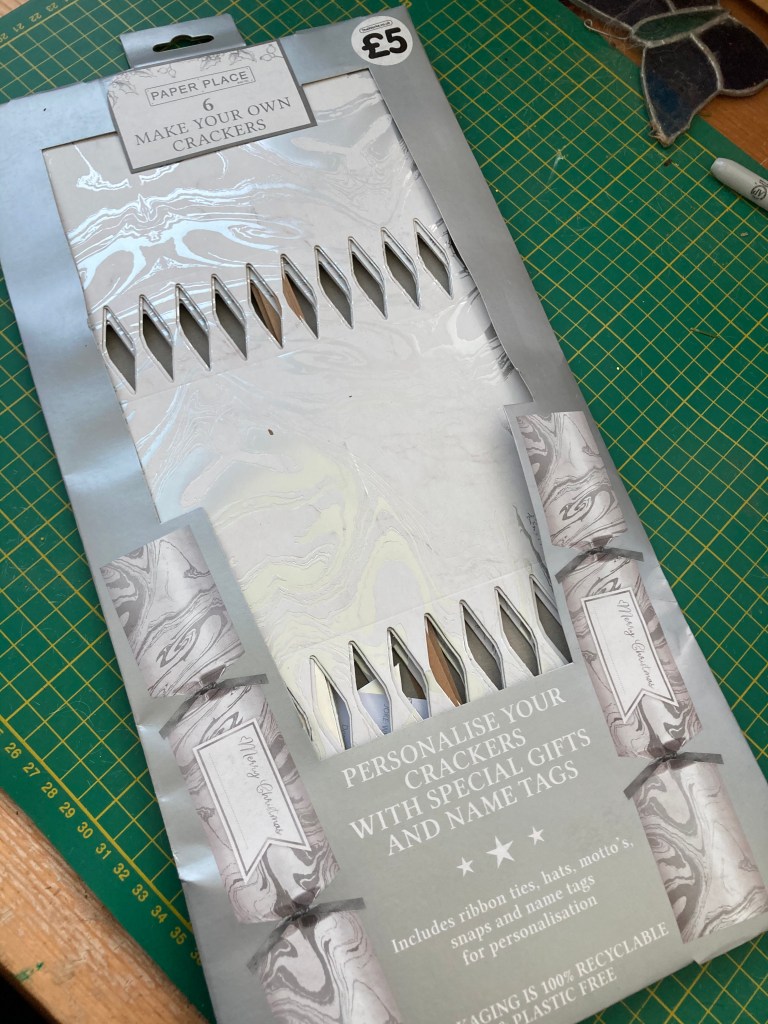
The kit includes the pre-cut cards to make the crackers, which have the snaps already glued to the inside. along with ribbons, paper hats, jokes and name tags. All you need to provide are gifts to go inside (if you want to), so you could add something useful or personal (and the name tags make them perfect for that), After all, the world really doesn’t need any more tiny plastic aeroplanes that are left on the table, to be binned along with the rest of the Christmas dinner debris!

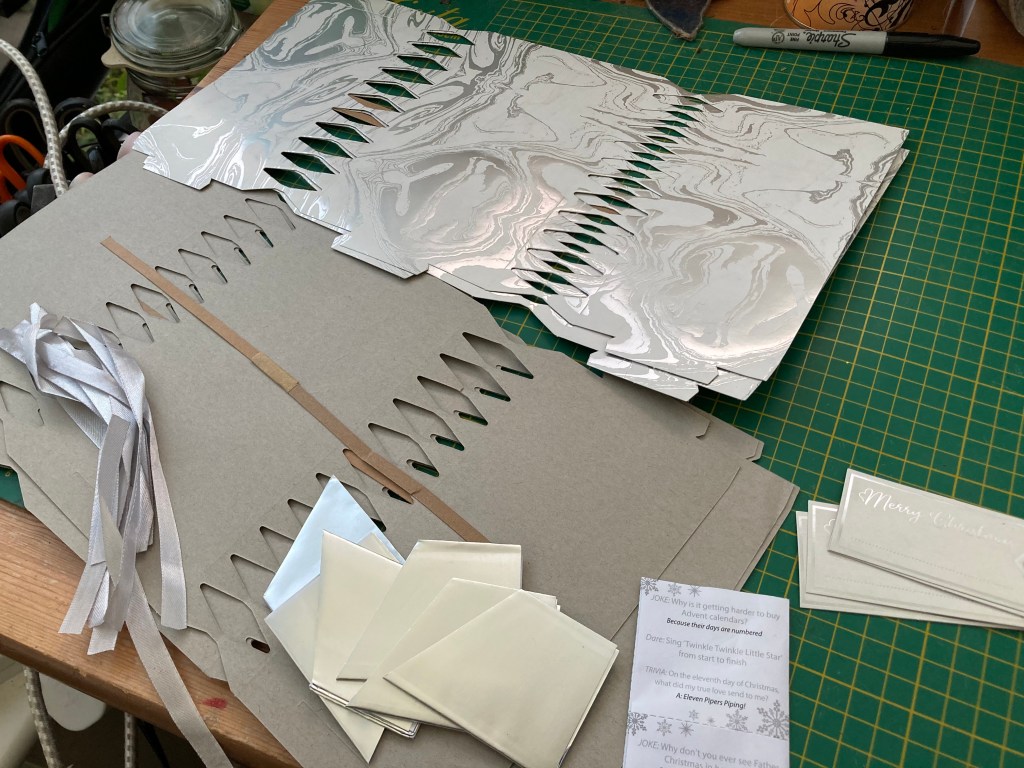
There were instructions on the packaging, including a template so you can see on the pack exactly what the final diameter of the cracker will be. That’s important if you are choosing gifts that will fit inside. I’ve added a few of steps of my own here . The cardboard shapes have very lightly scored lines and I found the crackers held their shape better if I creased along these lines to emphasise the fold points.

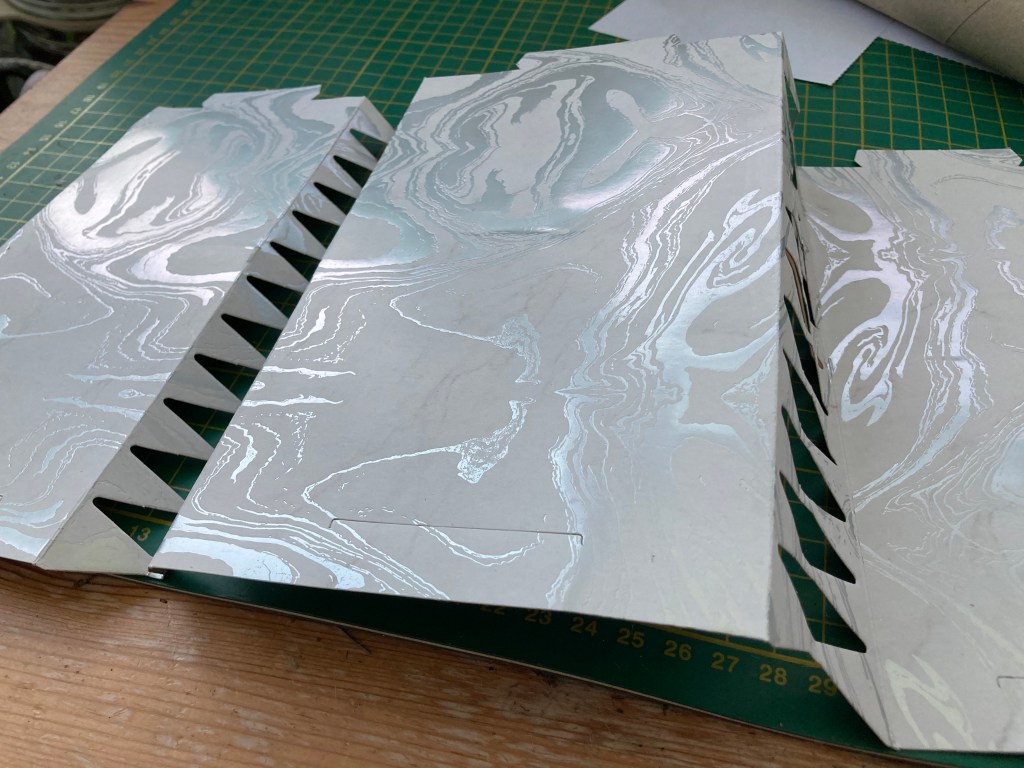
I then opened the card out flat, printed side down and rolled it up. A cardboard tube from inside a kitchen roll was my secret weapon at this stage, It held the shape of the cracker roll for the next stage, so I didn’t squash the whole thing flat.

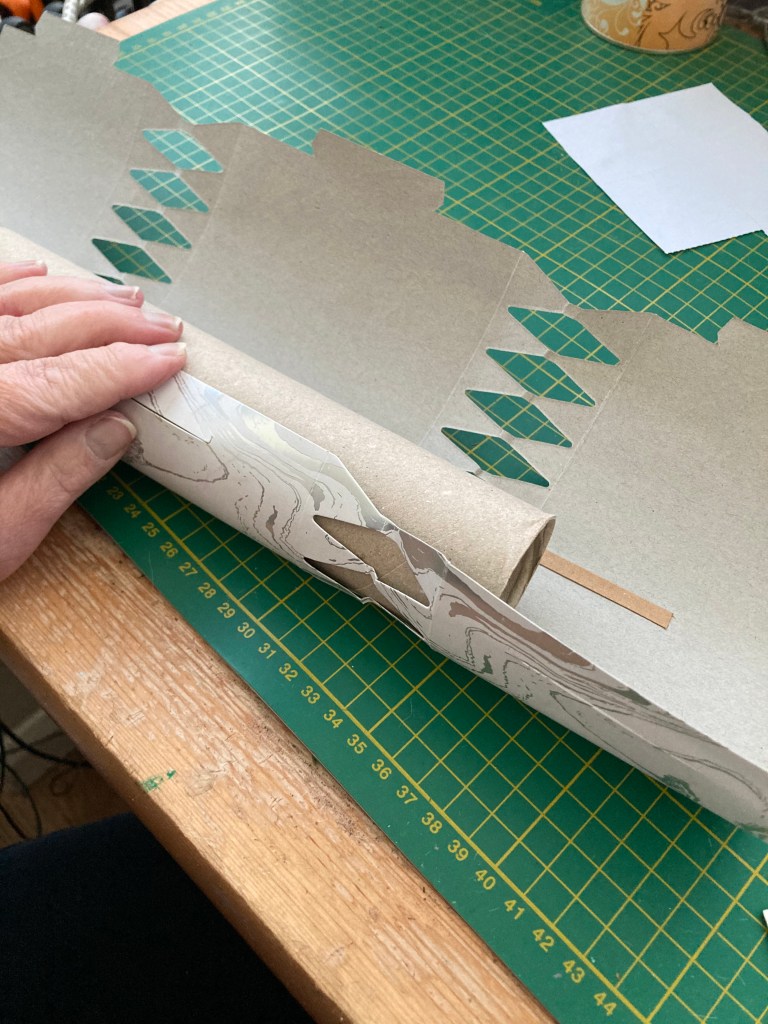
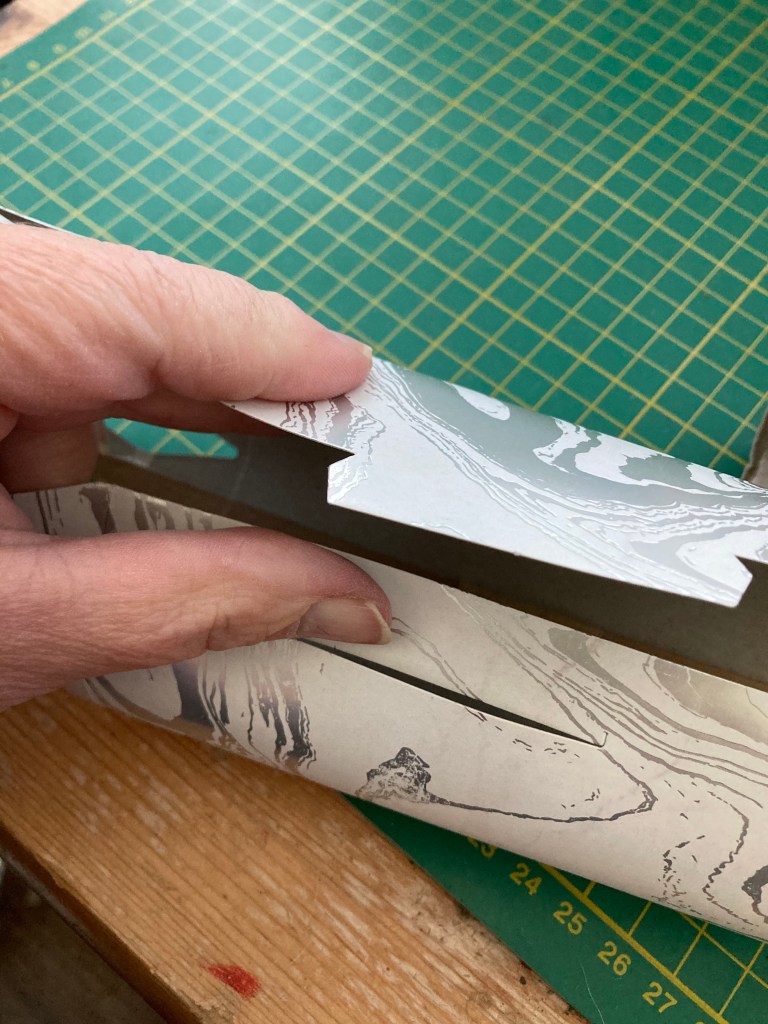
There are three tabs along one long edge that slot into the corresponding slits on the opposite edge. I found it easier to do the middle one first. I simply moved the cardboard kitchen roll tube along as I secured each tab, removing it when all three were in place. It is a bit fiddly but the tabs do fit – just be careful not to tear the card – if you do a small piece of sellotape on the inside will repair it.

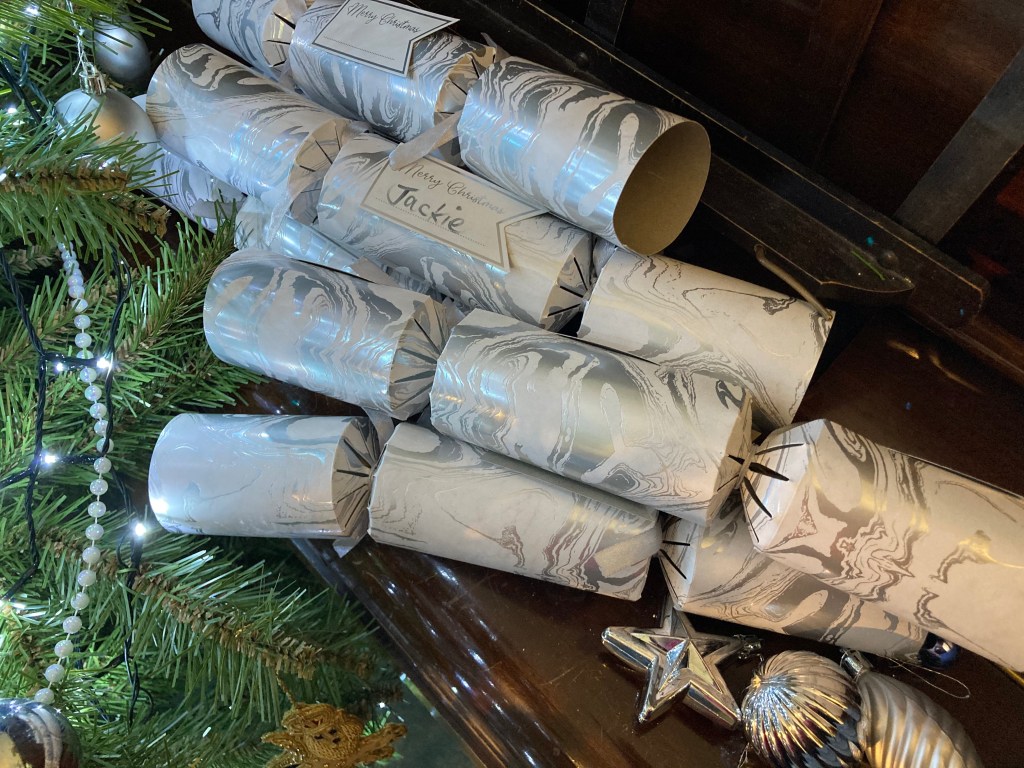
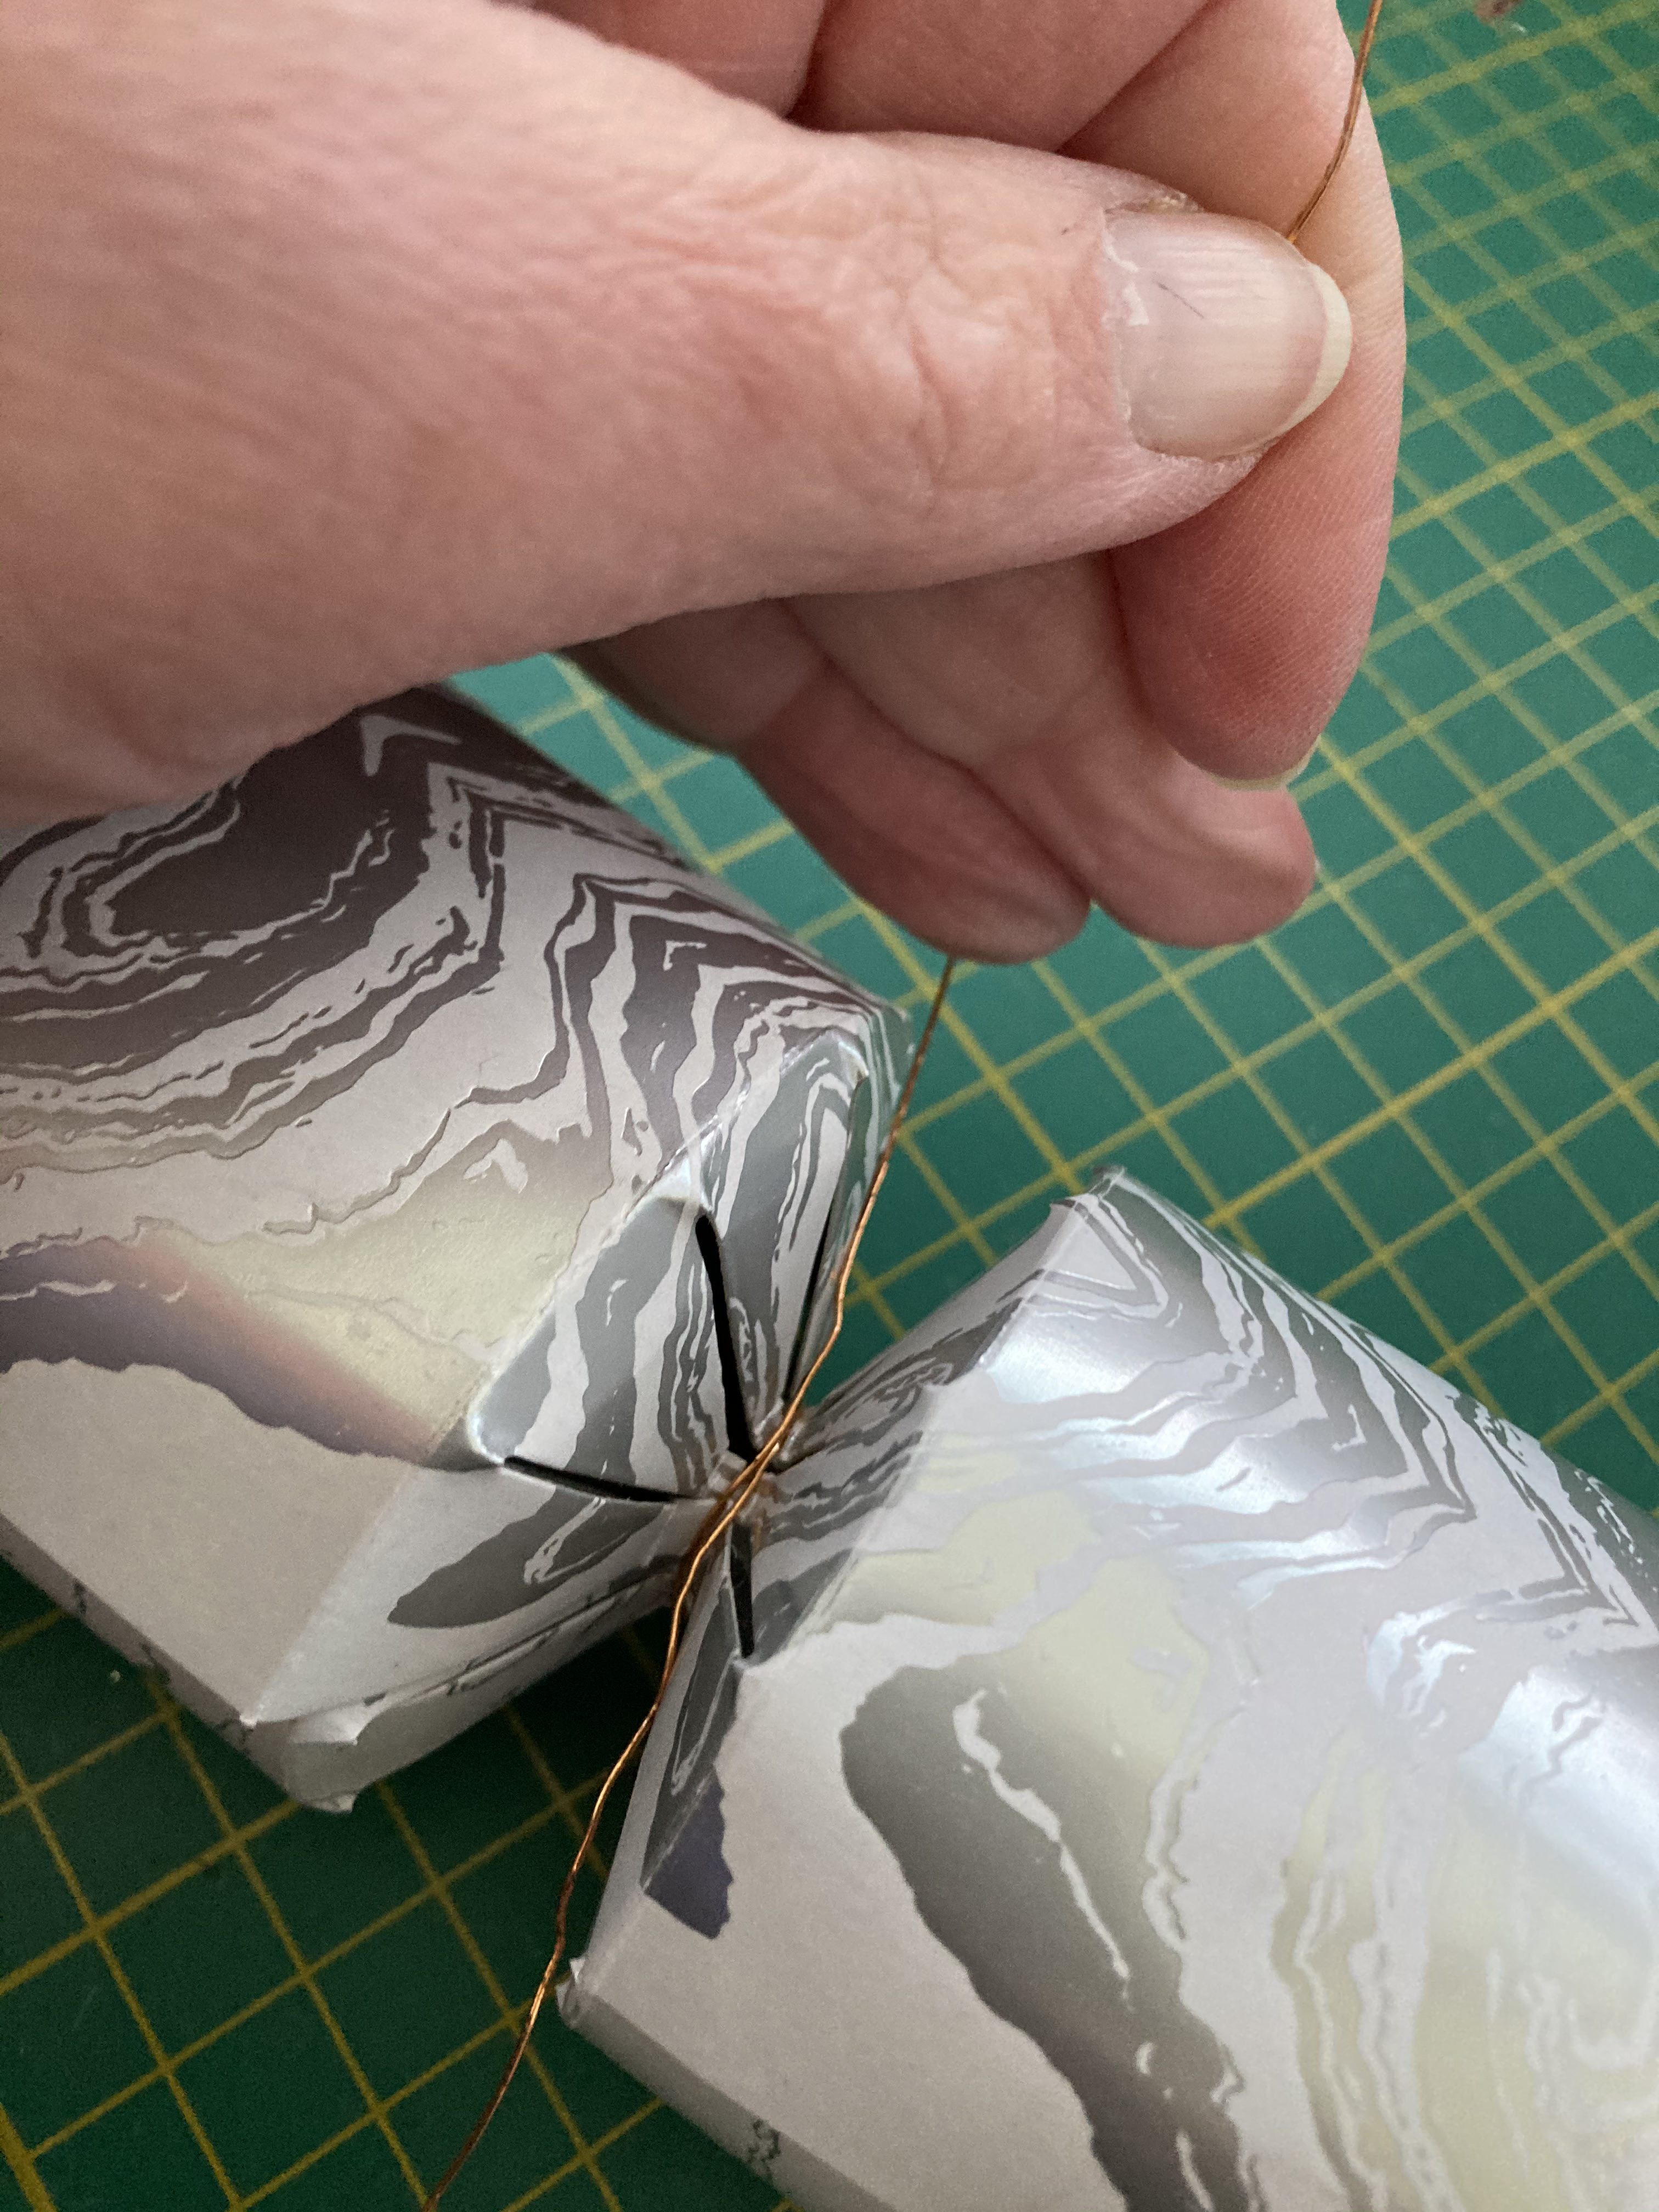
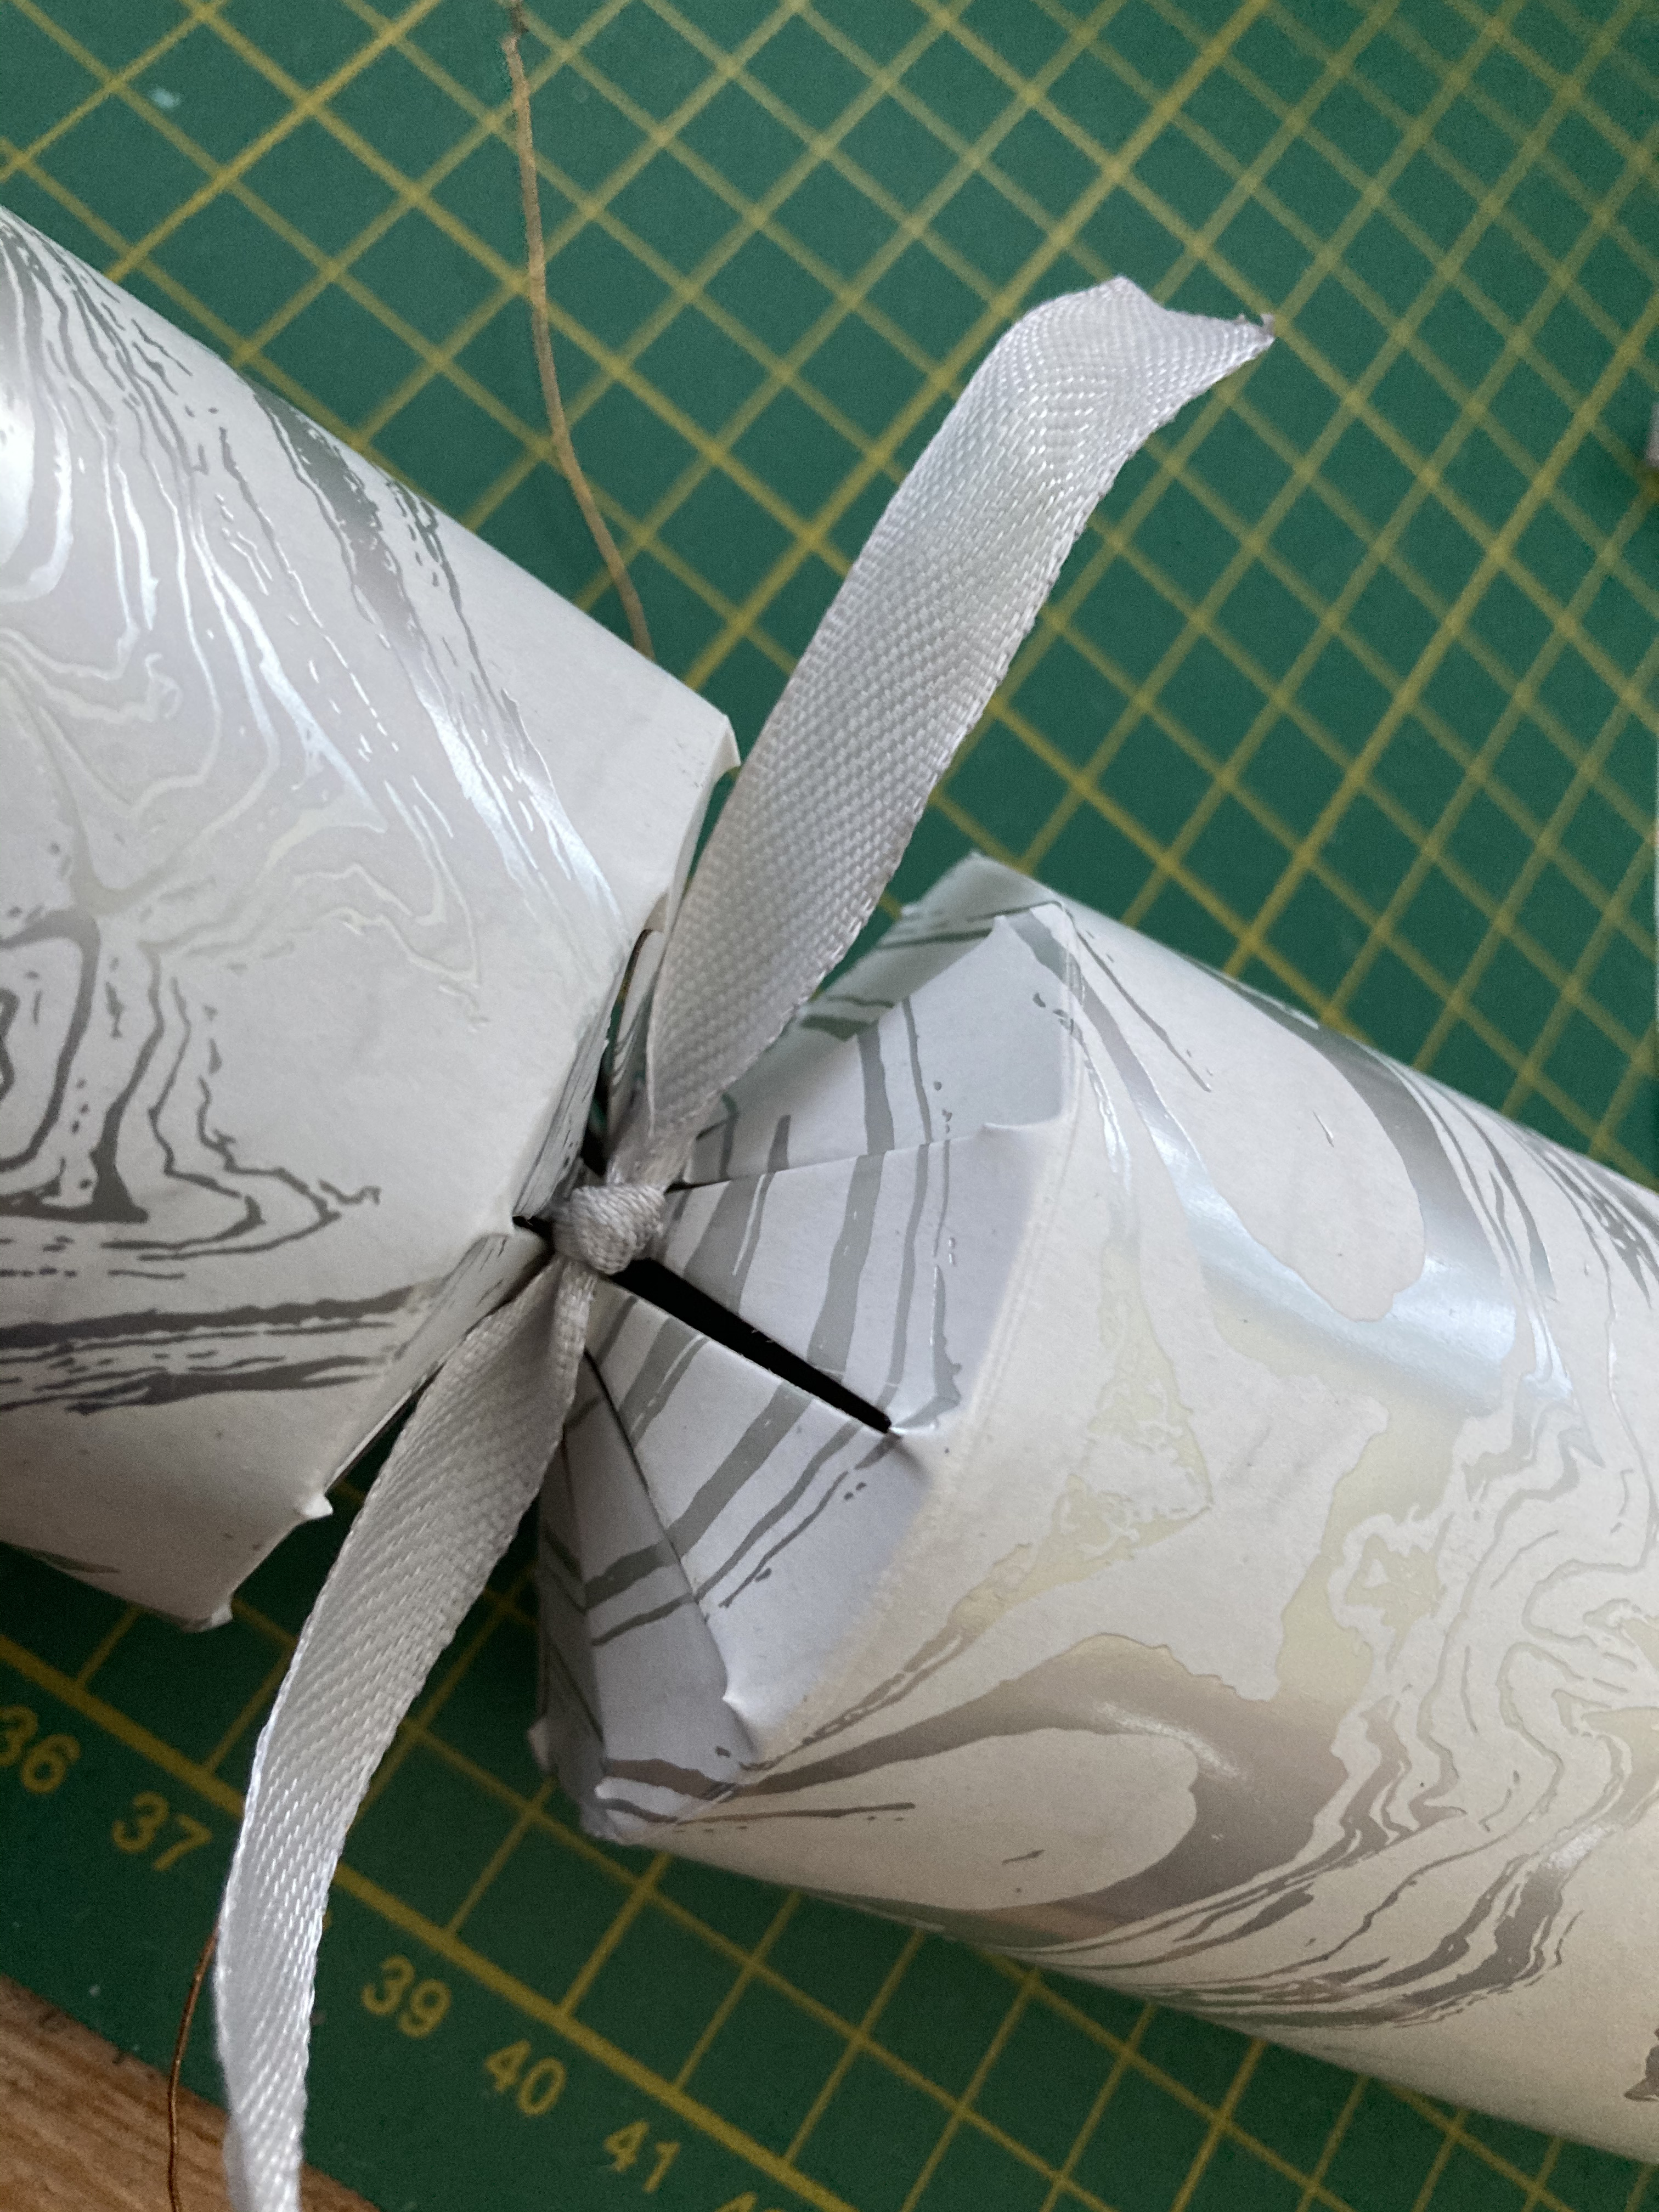
The next stage was crimping one of the ends and tying the ribbon on. Important! Don’t forget to drop the paper hat, motto and gift inside before repeating this step with the the other end of the cracker! I’m so glad I remembered! – I was glad Daughter was around to help (it was one of our Crafty Monday sessions- it was so much easier with two people. We deployed a length of craft wire here to loop around the crimp point, one of us pulling gently on the ends of the wire to form a narrow “waist” and them the other tied one of the pre-cut ribbons in a double knot. You can then gently pull the wire out

The name tag is self adhesive so can easily be attached after you’ve written it

There were materials to make six crackers and they did not take long to assemble, especially with two of us working on them. As you’d expect, the first one took longer, but once you work out how to do it the others take shape pretty quickly.

I’d definitely use these again. I love that they are plastic free and that you can add your own gift. The name tags means that you could use these instead of place cards. They could even be used as an alternative way of wrapping Christmas gifts, especially small, awkward shapes.

That’s something else crossed off my Christmas “to do” list!

Posted in Uncategorized

Knit and Natter 11th December

There appeared to be a bit of a spinners takeover at Fridays Knit and Natter Group. The two of us who spin are both new to the craft (since first lockdown) and I think we are both craving the opportunity to compare notes! My fellow spinner has now spun enough yarn in this lovely deep green to make an adult jumper and is well on with knitting it. This is going to be fabulous – it’s gansey style, with a lot of textural design across the chest and shoulders. You can see this in more detail on the pattern illustration

Her husband also started spinning at the same time so he joined us for part of the session (from another computer in the next room, where his spinning wheel is set up) – as always, screenshots don’t always work too well but you can make out the flyer on his wheel here.

She also told us about Knit in a Box. This is a subscription box – every month a box is delivered containing yarn and everything else you’ll need to make a garment (pattern, buttons etc) along with some treats (eg sweets) and knitting accessories. There are various subscription options available from 3 months in length and to knit items for babies, children (either girl or boy) or ladies.

Some lucky grandchildren have received a nice surprise from another member of the group. She just finished sewing these delightful Christmas stockings. There will be no arguments about which stocking belongs to which child when they are personalised like this. Very festive!

Since she got hold of some wool and needles there’s been no stopping our new member. She’s been making baby clothes and showed us her work in progress on this hat – such a gorgeous pink colour.

I’m still working on socks – I’ve not made much progress, but have now turned the heel on sock one.

Our online Knit and Natter Group runs on Zoom and is organised by the Social Prescribing Teams of GP surgeries in North Northumberland. It’s going to be pretty busy for the surgery staff over the next few months as COVID vaccinations are rolled out, not just for the clinical staff giving the injections but all the others too, organising the sessions and appointments and maintaining contact with the most vulnerable patients. We hope that Jane who hosts our meetings will be able to find time to wind down and do some relaxing knitting. She’s just learnt how to knit since she started running the group and has totally mastered garter stitch. We reckon she needs to get on YouTube to learn purl then she can do stocking stitch.

Posted in Uncategorized

Crafty Throwback – A Parade of Ponies

A few years ago a lovely friend of ours gave birth to a daughter. I usually knit clothes for new babies but this time I decided to do something different. I thought it would be fun to make a soft toy. The new mum has been a keen horsewoman since she was a little girl and has several horses. I thought I’d make a toy horse and make it as much like her favourite one as possible. I found a crochet pattern on Ravelry but adapted it quite a lot, changing the hooves, legs and ears significantly. That’s how I came to make a toy version of Mr Messy the chestnut cob. He’s very showy with a blonde mane and tail. I copied his white feet, crocheting them in white yarn – this worked at the second attempt. I was working from a picture of Mr Messy that had been taken after he’d been through some mud so I didn’t realise he had any white on his legs at all! I used beads for eyes, sewed on a felt patch for his white face and embroidered on his other features then attached a fringe for the mane and some longer strands for the tail.

When our friend had a second child, a boy this time, what could I do but make a version of her second favourite horse, Hettie the black mare.

Having seen the two I made for the babies, another friend ordered one of each of her two horses, a couple of hunters, both bay geldings, Roper and Toasty. I only have a picture of Roper here. but when I made these two I became aware of just how many different browns there are. At one point daughter was following a horse around holding up three balls of yarn so she could find the best match. I only make them now and again, but if I ever set up a business doing these I’d have to call it “Fifty Shades of Bay”!

Before long that baby girl I first made a horse for was big enough to be riding a pony of her own. Here she is with Tansy the Exmoor pony.

Around this time I’d learnt how to do needle felting, and this seemed like a great way to do facial details so I surface felted the little white star or Tansy’s forehead, her nostrils and the lighter colouring on her muzzle.

The other detail I always add are the horseshoes, like on the latest mini horse that I just finished last week – a nice finishing touch!

They are fun to do (though I wouldn’t want to be making them full time) and once you’ve overcome the initial colour matching challenge they come together quite quickly. They’ve always gone down really well with their new owners, a sort of cartoon miniature version of a much loved horse or pony.

Many thanks to A Heatherington and A Straughan for the photographs of their children and horses!

Posted in Uncategorized

Mend and Make Do Monday

There was no communal crafting with daughter yesterday as she had something else on so I completed a task I was given a little while ago. I had been asked to rescue a very old jacket which had a large hole (and a few smaller ones) near the hem.

I could see why this was something to attempt to save rather than get rid of. It was beautifully made. The button flap details on the vent at the back particularly caught my eye.

Even the buttons on the cuffs were fully functional, complete with buttonholes. Cuff buttons are more usually just decorative.

The smaller holes were fairly straightforward to darn but this hole was more complicated and too big to darn..

I could see there was a previous machine darn above the hole and this looked like a professionally done job, but it must have involved unpicking the lining, which I wanted to avoid. I needed to stabilise the fabric so I cut a piece of red felt to size and pushed it through the hole, adjusting it until it lay flat between the lining and outer fabric.

I pinned this in place and secured it with small stitches round the edge, then darned over the patch.

It may not be perfect, but it’s a great improvement on what was there before and if nothing else will stop the hole from getting bigger!

Doing a restoration job like this had me pretending that I was on Repair Shop. If you’ve never seen it this is a lovely British TV show, where members of the public bring much loved heirlooms, which have fallen into a sorry state of disrepair, to be restored by expert craftspeople. Whether these treasured items are ceramics, leather, furniture, clocks, paintings or old toys, the painstaking work of the experts is always astounding and the reaction of the owners on seeing their property returned to its former glory is touching to watch. It’s a definite must-see!

Posted in Uncategorized

Knit and Natter: 4th December

There were more lovely projects on show at Friday’s online Knit and Natter session, which is organised by the social prescribing teams at GP surgeries here in Northumberland. Our big news this week is we’ve had a write up in the UK national knitting press! This follows a request for more information about the group from Simply Knitting magazine.

Meanwhile, back on Zoom, we shared what we are working on. I won’t repeat my current and recently completed projects from yesterday’s post, but fellow knit and natterers are keeping very busy…..

Christmas knits continue with this cute little snowman….

…and a pair of Christmas angels.

This Fair Isle project is getting bigger. I absolutely love the duck egg/teal colour combination here.

If my memory serves me correctly, this next project is a baby jumper. The central panel with its lacy design is just gorgeous.

One of our recently joined members has taken knitting up again after a break and though it took her a while to get hold of needles and yarn during lockdown, she is now steaming ahead with charity knits including these two lovely baby hats.

The

The crocheted elephant that was still in pieces last week is now all done, complete with pink toenails! I think we’ve all fallen in love with him/her, especially having seen him come together over recent weeks.

One of the ladies from the Berwick group joined us on Zoom for the first time this week. She is a keen spinner too. I loved being able to talk to her and her husband (who is also a spinner and joined us briefly). Since I started spinning in September this is the first time I’ve actually had a conversation about my new obsession to a fellow enthusiast! They told me about some great sources of equipment and supplies. She is taking part in a Mystery Knit Along which has been organised by the Macmillan Cancer Support charity. In return for a donation to the charity, sections of a pattern were released gradually over 4 weeks. As the project is well underway now I don’t think it would be spoiling the mystery too much if I show a screenshot of her work on this.

Click on the link above if you’d like access to this lovely pattern by donating to a very worthwhile cause.

I think this was one of the best supported sessions we’ve had since the Zoom group got underway. It’s such a friendly group and I always look forward to Friday lunchtimes and seeing what everyone’s been up to.

Posted in Uncategorized

A Productive Week

I finished off a couple of projects this week which is always satisfying.

I crocheted this horse – a commission from a friend who will be giving it as a Christmas gift to a horse owner.

He’s a sort of caricature of her actual horse and I’ve replicated the colour and markings. His eyes are glass beads and the details are needle-felted. He’s wearing horseshoes embroidered in metallic thread.

I’ve made several of these over the last few years. One of the hardest things is finding the right colour yarn. I’ve modified the design from a pattern I found online and have refined it a bit more every time I’ve done it.

The second item I completed was a pair of brioche hand warmers for K. They will be part of his Christmas present. He’d requested some similar to some I made for myself a while back, but he wanted them in a much more neutral colour than the bright pink and grey stripes I used last time. He intends to use these for fishing – hopefully his hands will stay warm and his fingers will stay unencumbered for tying on lures and so on. I used this from my stash. It’s lost its band but I think it’s Stylecraft Special DK 100% acrylic. Most importantly it’s machine washable as, depending of how successful the fishing is, could potentially end up slimy, wet and stinking of fish after every wearing!

With a knitted project done I had nothing cast on so I’ve started some socks for myself – the pattern was given to me by a friend at one of my knit and natter groups – I’m using the version with the contrasting welt, heel and toe and using more yarn from the stash – I have a feeling both may be from Flying Tiger. I’ve bought all sorts of crafty things from the Newcastle store in recent years but I hear that this branch has now closed – I’m quite sad about that.

I’ve also been prepping and spinning alpaca fibre. I spun some I prepped a while back. The three larger skeins are 2ply, each about 100 yards. The smaller skeins (the white is more alpaca and the blue is merino) are my first attempt at chain plying, using some singles left over on bobbins after plying. I felt that this got better as I went along, but I must remember not to overtwist next time.

I washed a batch of the alpaca fibre I skirted last week and hand carded it. I’m improvising with pet grooming brushes until I get proper carders (I have it on good authority that Santa Claus is bringing me some…if I’m good). I’ve braided the roving as I intend to dye it eventually. It does look rather messier than the braids of fibre that you buy, but in it’s current undyed state I thought it resembled the hair of Elsa from Frozen. I promise not to put it over my shoulder and start singing Let it Go!

Posted in Uncategorized

Christmas Crafts: Door Wreaths

For this week’s Crafty Monday project, Daughter and I made Christmas wreaths. We enjoyed attending a workshop to make these last year, but classes like that are another COVID casualty. One of Daughter’s friends has started a floristry business: Polly’s Petals and makes stunning wreaths and kits with everything needed to make your own. Polly’s family have a large garden and much of the material is sourced from there. She even makes her own dried citrus slices, drying the fruit in the aga. Daughter went to collect the kits we’d ordered yesterday morning and arrived here with two large boxes.

Each included

  • florists foam ring and base
  • hanging string
  • huge amounts of foliage (included cypress, Scots pine, holly, ivy and various other evergreens,
  • dried seed heads, teasels, grasses, pine cones
  • dried citrus and cinnamon stick bundles
  • berries
  • pheasant feathers
  • ribbon
  • florists wire
  • full instructions

There was more than enough in each to make quite a substantial wreath and all we needed to provide were secateurs or strong scissors. We began by soaking the foam in water for ten minutes and attaching a hanging loop.

Working from the outside, we began to cut small sprigs of foliage and pushed it into the foam.

We continued until the whole wreath was covered and no foam was showing.

We then added the other items, twisting florists wire round the citrus and cones to make a stem to push in the foam.

I have vast numbers of feathers so I added some of my own. I looked in the ribbon box and found a length in a pinky peachy shade that looked perfect so I used that instead of what came in the kit.

Daughter added some gun cartridge ends and found some gold ribbon

Even though the kit contents were very similar our wreaths are very different. We love them. Thanks Polly!

Posted in Uncategorized

Sunday Dog Walk: Newton-by-the-Sea

Sunday was a dull, dank sort of a day, but we headed up the coast to Newton-by-the-Sea. Daughter, K and Buddy went along the sand and I took the dune path, which is more scooter friendly.

Behind the dunes are a series of ponds that are a magnet for waterfowl. I could hear a flock of geese fly by. As they came down in an adjacent field another flock flew up. What a din they made!

Further on there are reed beds.

The bird hide that overlooks the main pool is locked up at the moment – (another consequence of the pandemic) .

At the side of the path is this rather interesting seat

Sheltered by a woven willow screen, a simple bench has been decorated with driftwood and bits of discarded fishing gear washed up on the tide.

There was so much moisture in the air that dew was condensing on to plants like this Burnet rose.

The cobwebs looked bejewelled with raindrops.

The only wildflowers I saw were an occasional hogweed flower…..

…and bright yellow gorse.

The gorse, known locally as whin, blooms throughout the year. At the end of November it brings a very welcome splash of colour.

Posted in Uncategorized

Knit and Natter 27th November

We had another lively meeting of Online Knit and Natter on Friday. Having completed this Christmas stocking tree decoration…..

…this member is continuing with her waterfall front cardigan. Isn’t this a lovely shade of pink?

We’ve had more gorgeous colour work from Lorna. She’s finished this cowl……

…and made a pincushion….

… but has now begun this.

I’m crocheting a horse!

And we mustn’t forget the elephant in the room!

Even his toenails are taking shape!

Posted in Uncategorized

Fascinating Feathers

Cock pheasant tail feathers

After I posted about the pheasant feather Christmas tree baubles that I made, Tinaor from handmadehomemadeknitstitchdesign.wordpress.com asked how I had so many feathers. Before I come to that, I have to say that I do think feathers are pretty amazing.

Feathers are pretty multifunctional. First of all, they keep birds warm. The soft fluffy down at the base of the feather traps air to provide an insulating layer. by fluffing up the feathers in cold weather, more air is trapped and the bird stays even warmer. This is particularly important in chicks – they are covered in warm down when very young and their proper feathers grow in later.

cock pheasant feathers are a rich chestnut colour

They can also keep the bird dry – waterfowl have an oil gland at the base of the tail. The bird spreads the water-repellent oil over the feathers so any water landing on them simply runs off – water off a duck’s back!

Water droplets on a duck feather

Feathers enable flight. They have a central hollow stem – the vane, with hair-like barbs growing out the sides. each barb has a line of tiny hooks known as barbules that hold the barbs together, rather like velcro. We’ve all played with feathers as children, zipping and unzipping them.

Hen pheasant flight feather with close-up to show interlocking barbs

This structure is strong but very light. The flight feathers, on wings and tail are the strongest of all – they overlap to form the thin rear edge of the wing, angled to gain lift and steer the bird.

Feather colour varies enormously. It may be dull to camouflage the bird against its background habitat. This is vital to ground nesting birds, to protect them and their eggs and from predators when on the nest. In many species the sexes are different, with the males’ more colourful plumage used to attract a mate. In some cases the feathers might be structurally different too for use in courtship displays. The spectacular fanned tail of the peacock , with shimmering “eyes” is a prime example of this.

Peacock “eye”

Pretty remarkable really. But it doesn’t explain why I have so many!. Well, a few years back I went on a one-day course about making fascinators. I thought I’d make some with pheasant feathers. Now I knew that a local farmer friend has a pheasant shoot on his land, so I asked him if I could have some feathers. He explained that someone comes in after a shoot and plucks and dresses the birds, after which they go off to a game dealer/butcher but he’d be happy to save some tails for me. A while later he told me he had them and brought three sacks full of pheasant and duck tails and wings out of the back of his Landrover! I spent three days cleaning the feathers!

I did make some nice hats and fasinators though.

Bolcked felt beret with cock pheasant feather trim

I wore this one for a friend’s wedding.

Fascinator with cock pheasant feathers

My conversation with the farmer was overheard by a lady who asked me if I could make use of peacock feathers too. She explained that there were peacocks living wild where she walks her dog. Apparently someone who used to live nearby had kept them as pets and they escaped – the owner moved away but the peacock colony had become established in a patch of woodland nearby. She was always finding moulted peacock feathers on her dog walks and gave me a few she’d found the next time I saw her. I didn’t see her for a few months, then she phoned me. She’d collected a load more and wondered if I could collect them , which I did. There was a massive armful of them, some almost four feet long!

I have some really generous friends. I will of course never ever be short of feathers for craft projects!